Spring Security原理剖析及其实战
Spring Security原理剖析及其实战
课程内容:
- Spring Security使用详解
- 认证和授权相关配置详解和原理分析
- Spring Security实现原理和源码分析
1. Spring Security介绍
1.1 Spring Security定义
Spring Security是一个能够为基于Spring的企业应用系统提供声明式的安全访问控制解决方案的安全框架。Spring Security 主要实现了Authentication(认证,解决who are you? ) 和 Access Control(访问控制,也就是what are you allowed to do?,也称为Authorization)。Spring Security在架构上将认证与授权分离,并提供了扩展点。
FROM 《Spring Security 官网》
Spring Security is a powerful and highly customizable authentication and access-control framework. It is the de-facto standard for securing Spring-based applications. Spring Security 是一个功能强大且高度可定制的身份验证和访问控制框架。它是用于保护基于 Spring 的应用程序。
Spring Security is a framework that focuses on providing both authentication and authorization to Java applications. Like all Spring projects, the real power of Spring Security is found in how easily it can be extended to meet custom requirements Spring Security 是一个框架,侧重于为 Java 应用程序提供身份验证和授权。与所有 Spring 项目一样,Spring 安全性的真正强大之处,在于它很容易扩展以满足定制需求。
认证 :用户认证就是判断一个用户的身份是否合法的过程,用户去访问系统资源时系统要求验证用户的身份信息,身份合法方可继续访问,不合法则拒绝访问。常见的用户身份认证方式有:用户名密码登录,二维码登录,手机短信登录,指纹认证等方式。
授权: 授权是用户认证通过根据用户的权限来控制用户访问资源的过程,拥有资源的访问权限则正常访问,没有权限则拒绝访问。
1.2 Spring Security和Shiro比较
在 Java 生态中,目前有 Spring Security 和 Apache Shiro 两个安全框架,可以完成认证和授权的功能。
- Spring Security
- Apache Shiro:一个功能强大且易于使用的Java安全框架,提供了认证,授权,加密,和会话管理。
相同点:
1:认证功能
2:授权功能
3:加密功能
4:会话管理
5:缓存支持
6:rememberMe功能.......
不同点:
优点:
1:Spring Security基于Spring开发,项目中如果使用Spring作为基础,配合Spring Security做权限更加方便,而Shiro需要和Spring进行整合开发
2:Spring Security功能比Shiro更加丰富些,例如安全防护
3:Spring Security社区资源比Shiro丰富
缺点:
1:Shiro的配置和使用比较简单,Spring Security上手复杂
2:Shiro依赖性低,不需要任何框架和容器,可以独立运行,而Spring Security依赖于Spring容器
一般来说,常见的安全管理技术栈的组合是这样的: • SSM + Shiro • Spring Boot/Spring Cloud + Spring Security
1.3 Spring Security 模块
- 核心模块 - spring-security-core.jar:包含核心验证和访问控制类和接口,远程支持的基本配置API,是基本模块
- 远程调用 - spring-security-remoting.jar:提供与 Spring Remoting 集成
- 网页 - spring-security-web.jar:包括网站安全的模块,提供网站认证服务和基于URL访问控制
- 配置 - spring-security-config.jar:包含安全命令空间解析代码,若使用XML进行配置则需要
- LDAP - spring-security-ldap.jar:LDAP 验证和配置,若需要LDAP验证和管理LDAP用户实体
- ACL访问控制表 - spring-security-acl.jar:ACL(Access Control List)专门领域对象的实现
- CAS - spring-security-cas.jar:CAS(Central Authentication Service)客户端继承,若想用CAS的SSO服务器网页验证
- OpenID - spring-security-openid.jar:OpenID网页验证支持
- Test - spring-security-test.jar:支持Spring Security的测试
2. Spring Security使用
2.1 用户身份认证
快速开始
基于Spring Boot实现
引入依赖
<!-- 实现对 Spring MVC 的自动化配置 -->
<dependency>
    <groupId>org.springframework.boot</groupId>
    <artifactId>spring-boot-starter-web</artifactId>
</dependency>

<!-- 实现对 Spring Security 的自动化配置 -->
<dependency>
    <groupId>org.springframework.boot</groupId>
    <artifactId>spring-boot-starter-security</artifactId>
</dependency>
编写controller
@RestController
@RequestMapping("/admin")
public class AdminController {


    @GetMapping("/demo")
    public String demo() {
        return "spring security demo";
    }

}
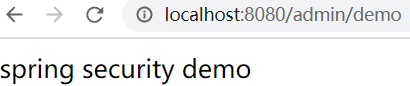
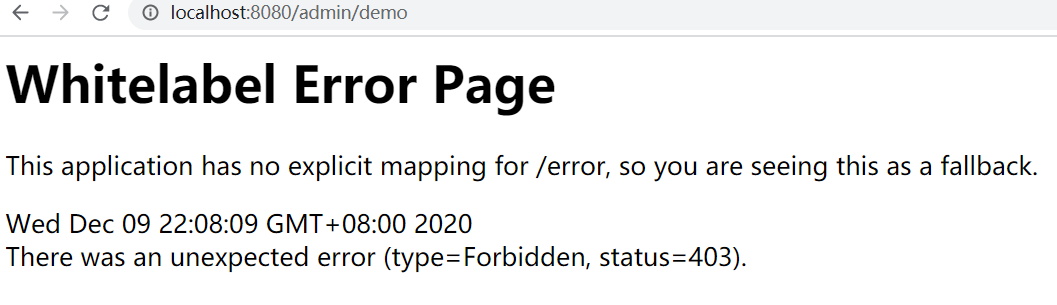
引入Spring Security之后 ,访问 API 接口时,需要首先进行登录,才能进行访问。
测试 http://localhost:8080/admin/demo ,会跳转到
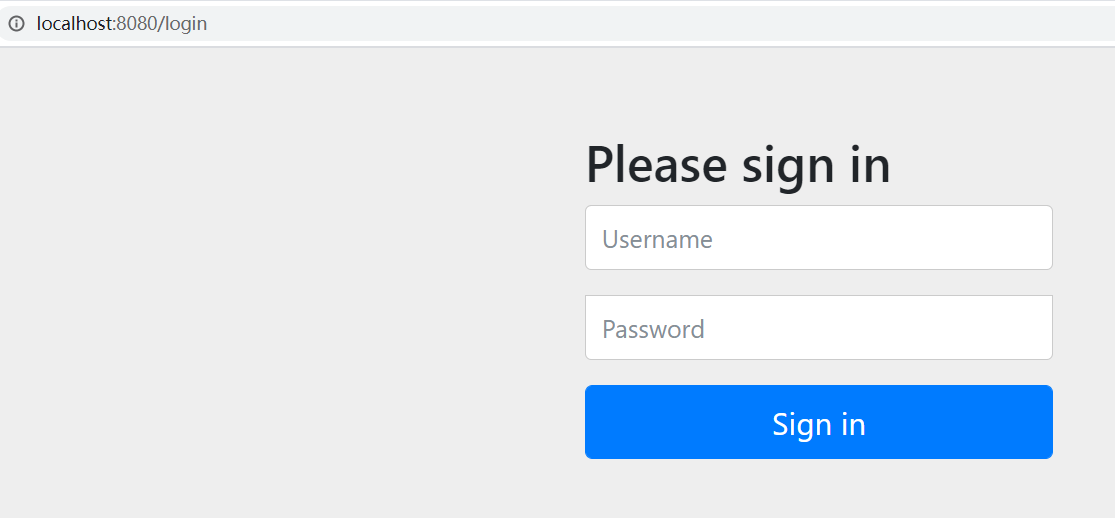
DefaultLoginPageGeneratingFilter#generateLoginPageHtml
需要登录,默认用户名:user,密码可以查看控制台日志获取

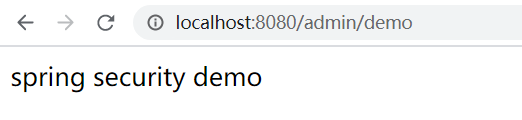
登录之后跳转到:
设置用户名密码
基于application.yaml
可以在application.yaml中自定义用户名密码:
spring:
  # Spring Security 配置项,对应 SecurityProperties 配置类
  security:
    # 配置默认的 InMemoryUserDetailsManager 的用户账号与密码。
    user:
      name: fox # 账号
      password: 123456 # 密码
      roles: ADMIN # 拥有角色
思考: 为什么可以这样配置?
原理:
默认情况下,UserDetailsServiceAutoConfiguration自动化配置类,会创建一个内存级别的 InMemoryUserDetailsManager对象,提供认证的用户信息。
- 添加
spring.security.user配置项,UserDetailsServiceAutoConfiguration 会基于配置的信息在内存中创建一个用户User。- 未添加
spring.security.user配置项,UserDetailsServiceAutoConfiguration 会自动在内存中创建一个用户名为 user,密码为 UUID 随机的用户 User。
基于UserDetailsService接口
@Service
public class UserDetailsServiceImpl implements UserDetailsService {

    @Override
    public UserDetails loadUserByUsername(String username) throws UsernameNotFoundException {
        //String hashpw = BCrypt.hashpw("123456", BCrypt.gensalt());
        UserDetails userDetails = User.withUsername("fox")
                .password("{noop}123456").authorities("admin").build();

        return userDetails;
    }
}
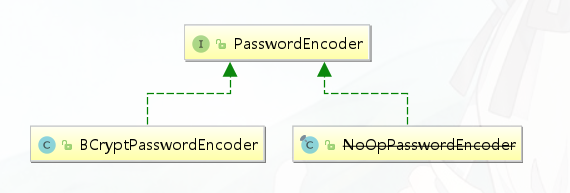
 Spring security5中新增加了加密方式,并把原有的spring security的密码存储格式改了,修改后的密码存储格式为:
{id}encodedPassword
如果密码不指定{id}会抛异常:

支持的加密方式可以通过PasswordEncoderFactories查看
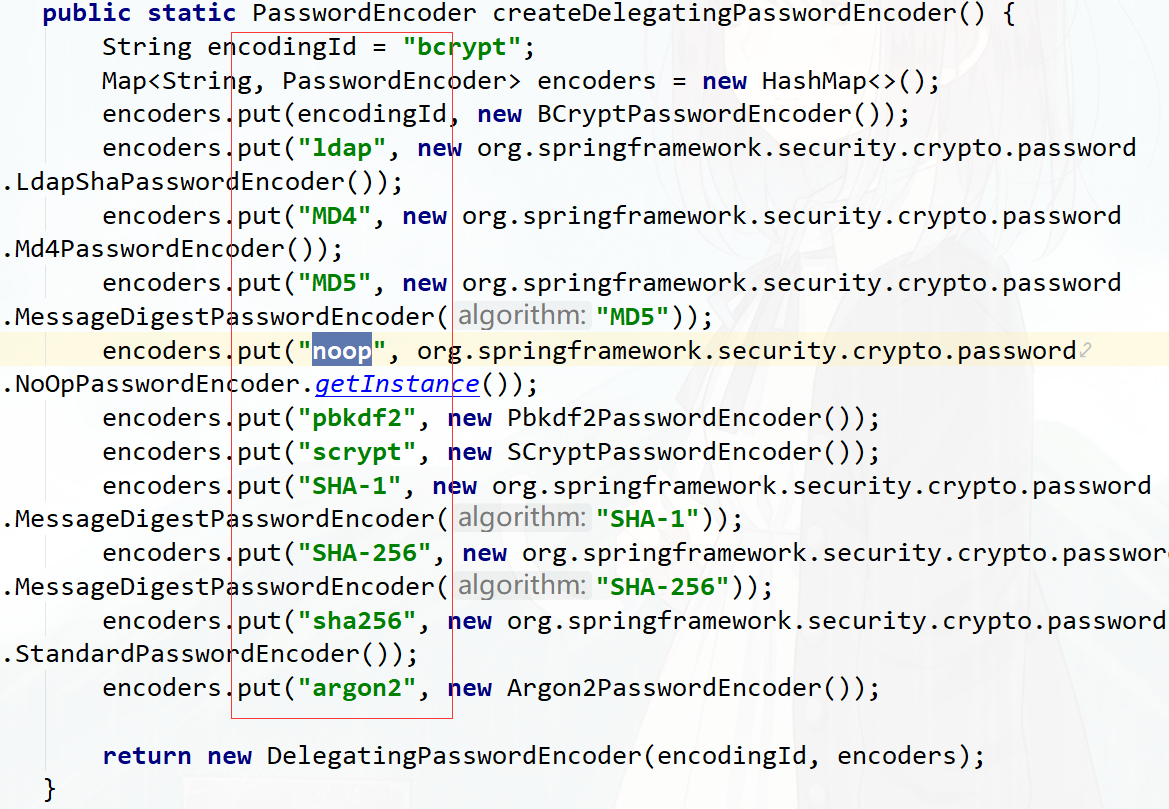
也可以通过增加PasswordEncoder配置指定加密方式
@Configuration
public class WebSecurityConfig {

    @Bean
    public PasswordEncoder passwordEncoder(){
        return NoOpPasswordEncoder.getInstance();
    }
}

@Override
public UserDetails loadUserByUsername(String username) throws UsernameNotFoundException {
    //String hashpw = BCrypt.hashpw("123456", BCrypt.gensalt());
    UserDetails userDetails = User.withUsername("fox")
        .password("123456").authorities("admin").build();

    return userDetails;
}
spring security官方推荐的加密方式BCrypt
@Bean
public PasswordEncoder passwordEncoder(){
    //return NoOpPasswordEncoder.getInstance();
    return new BCryptPasswordEncoder();
}

@Autowired
private PasswordEncoder passwordEncoder;

@Override
public UserDetails loadUserByUsername(String username) throws UsernameNotFoundException {
    //String hashpw = BCrypt.hashpw("123456", BCrypt.gensalt());
    String hashpw = passwordEncoder.encode("123456");
    UserDetails userDetails = User.withUsername("fox")
        .password(hashpw).authorities("admin").build();

    return userDetails;
}
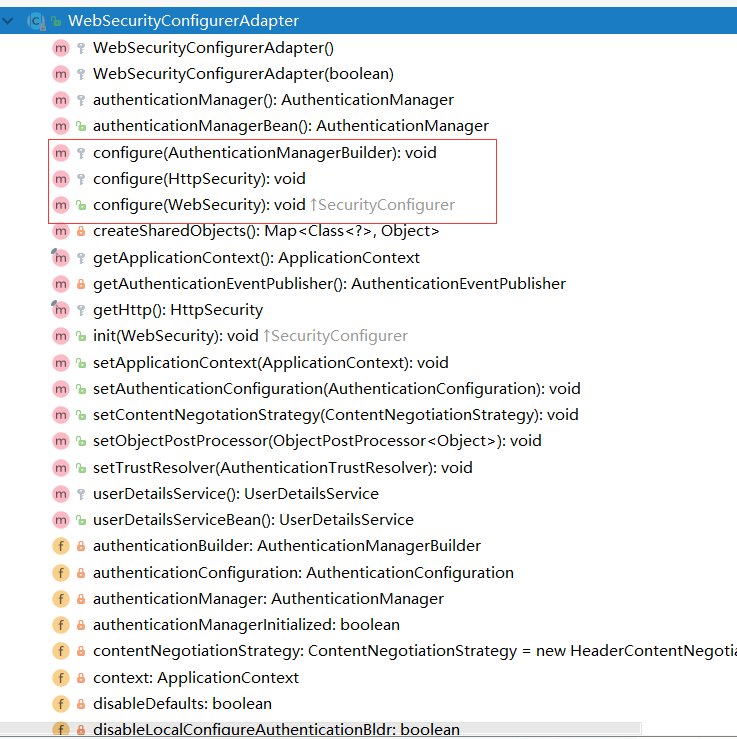
基于配置类WebSecurityConfigurerAdapter
创建 WebSecurityConfig配置类,继承 WebSecurityConfigurerAdapter抽象类,实现 Spring Security 在 Web 场景下的自定义配置。
@Configuration
public class WebSecurityConfig extends WebSecurityConfigurerAdapter {


}
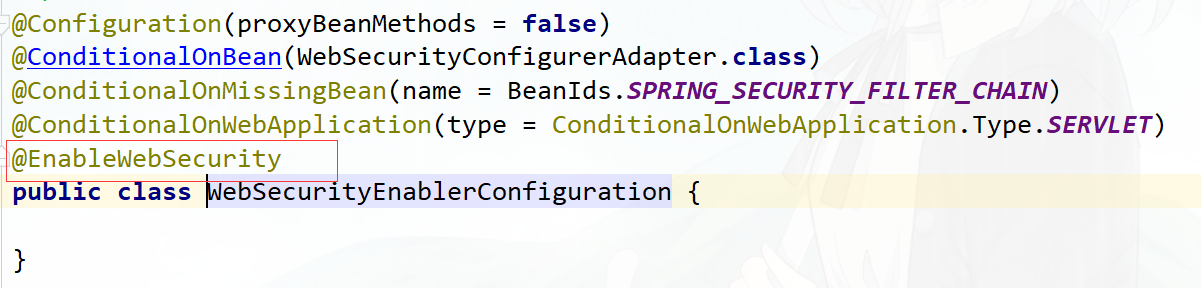
思考: 是否需要添加@EnableWebSecurity注解?
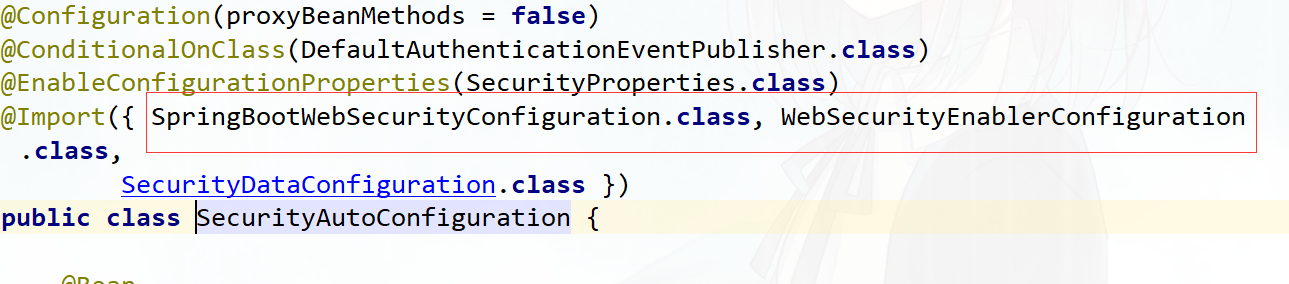
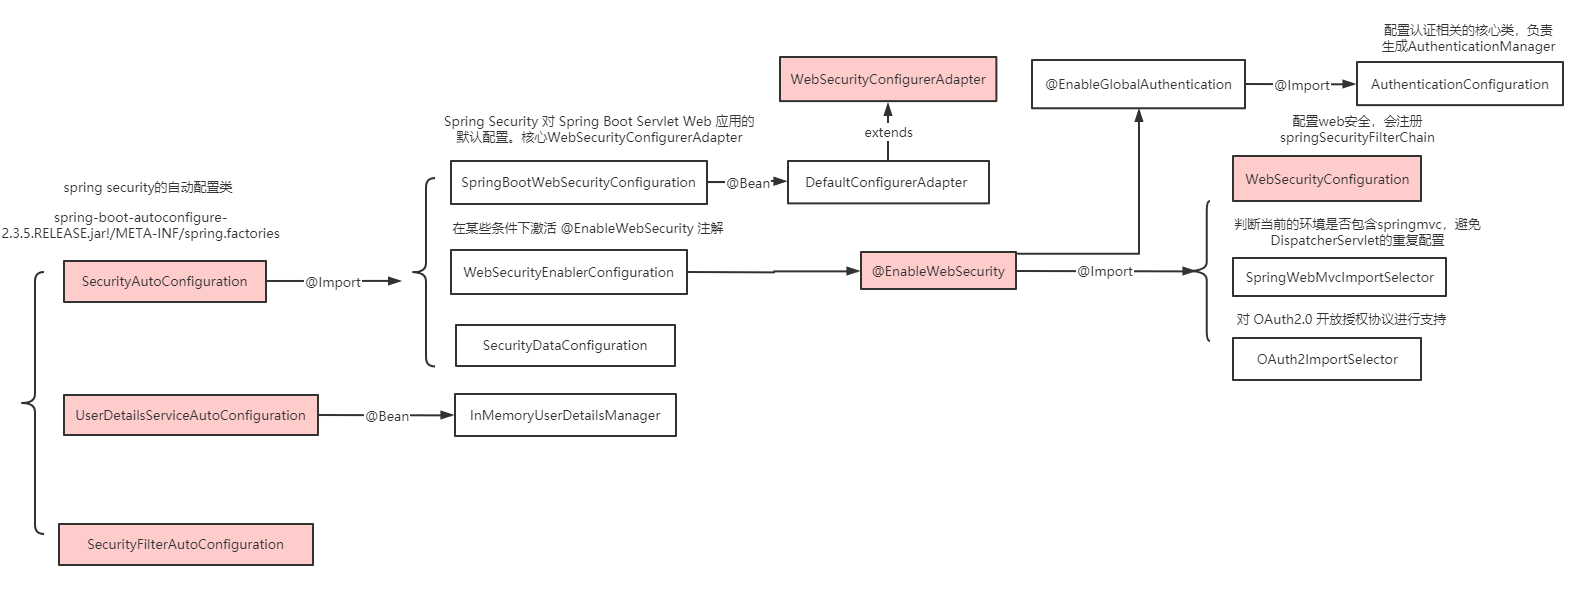
springboot项目中如果引入的是spring-boot-starter-security依赖不需要添加@EnableWebSecurity,可以参考自动配置类:
spring-boot-autoconfigure-2.3.5.RELEASE.jar!/META-INF/spring.factories 下 SecurityAutoConfiguration
image-20201122151919204 image-20201122152100937 如果引入的是spring-security-config和spring-security-web依赖,则需要添加@EnableWebSecurity注解。
重写 #configure(AuthenticationManagerBuilder auth) 方法,实现 AuthenticationManager认证管理器。
@Configuration
public class WebSecurityConfig extends WebSecurityConfigurerAdapter {

    @Override
    protected void configure(AuthenticationManagerBuilder auth) throws Exception {
        String password = passwordEncoder().encode("123456");
        auth
            // 使用基于内存的 InMemoryUserDetailsManager
            .inMemoryAuthentication()
            //使用 PasswordEncoder 密码编码器
            //.passwordEncoder(passwordEncoder())
            // 配置用户
            .withUser("fox").password(password).roles("admin")
            // 配置其他用户
            .and()
            .withUser("fox2").password(password).roles("user");

    }

    @Bean
    public PasswordEncoder passwordEncoder(){
        //return NoOpPasswordEncoder.getInstance();
        return new BCryptPasswordEncoder();
    }
}
也可以重写WebSecurityConfigurerAdapter#userDetailsService()方法或者
WebSecurityConfigurerAdapter#userDetailsServiceBean(),并通过@Bean交给spring管理
@Configuration
public class WebSecurityConfig2 extends WebSecurityConfigurerAdapter {

    @Bean
    @Override
    protected UserDetailsService userDetailsService() {

        return new UserDetailsService() {
            @Override
            public UserDetails loadUserByUsername(String username) throws UsernameNotFoundException {
                String pw = passwordEncoder().encode("123456");
                return new User("fox", pw, AuthorityUtils.commaSeparatedStringToAuthorityList("admin,user"));
            }
        };

    }

    @Bean
    public PasswordEncoder passwordEncoder() {
        //return NoOpPasswordEncoder.getInstance();
        return new BCryptPasswordEncoder();
    }
}
实现数据库认证
创建数据库 BRAC
CREATE TABLE `tb_user` (
  `id` bigint(20) NOT NULL AUTO_INCREMENT,
  `username` varchar(50) NOT NULL COMMENT '用户名',
  `password` varchar(64) NOT NULL COMMENT '密码,加密存储',
  `phone` varchar(20) DEFAULT NULL COMMENT '注册手机号',
  `email` varchar(50) DEFAULT NULL COMMENT '注册邮箱',
  `created` datetime NOT NULL,
  `updated` datetime NOT NULL,
  PRIMARY KEY (`id`),
  UNIQUE KEY `username` (`username`) USING BTREE,
  UNIQUE KEY `phone` (`phone`) USING BTREE,
  UNIQUE KEY `email` (`email`) USING BTREE
) ENGINE=InnoDB AUTO_INCREMENT=38 DEFAULT CHARSET=utf8 COMMENT='用户表';
insert  into `tb_user`(`id`,`username`,`password`,`phone`,`email`,`created`,`updated`) values
(37,'fox','$2a$10$9ZhDOBp.sRKat4l14ygu/.LscxrMUcDAfeVOEPiYwbcRkoB09gCmi','158xxxxxxx','[email protected]','2019-04-04 23:21:27','2019-04-04 23:21:29');

CREATE TABLE `tb_role` (
  `id` bigint(20) NOT NULL AUTO_INCREMENT,
  `parent_id` bigint(20) DEFAULT NULL COMMENT '父角色',
  `name` varchar(64) NOT NULL COMMENT '角色名称',
  `enname` varchar(64) NOT NULL COMMENT '角色英文名称',
  `description` varchar(200) DEFAULT NULL COMMENT '备注',
  `created` datetime NOT NULL,
  `updated` datetime NOT NULL,
  PRIMARY KEY (`id`)
) ENGINE=InnoDB AUTO_INCREMENT=38 DEFAULT CHARSET=utf8 COMMENT='角色表';
insert  into `tb_role`(`id`,`parent_id`,`name`,`enname`,`description`,`created`,`updated`) values
(37,0,'超级管理员','fox',NULL,'2019-04-04 23:22:03','2019-04-04 23:22:05');


CREATE TABLE `tb_user_role` (
  `id` bigint(20) NOT NULL AUTO_INCREMENT,
  `user_id` bigint(20) NOT NULL COMMENT '用户 ID',
  `role_id` bigint(20) NOT NULL COMMENT '角色 ID',
  PRIMARY KEY (`id`)
) ENGINE=InnoDB AUTO_INCREMENT=38 DEFAULT CHARSET=utf8 COMMENT='用户角色表';
insert  into `tb_user_role`(`id`,`user_id`,`role_id`) values
(37,37,37);

CREATE TABLE `tb_permission` (
  `id` bigint(20) NOT NULL AUTO_INCREMENT,
  `parent_id` bigint(20) DEFAULT NULL COMMENT '父权限',
  `name` varchar(64) NOT NULL COMMENT '权限名称',
  `enname` varchar(64) NOT NULL COMMENT '权限英文名称',
  `url` varchar(255) NOT NULL COMMENT '授权路径',
  `description` varchar(200) DEFAULT NULL COMMENT '备注',
  `created` datetime NOT NULL,
  `updated` datetime NOT NULL,
  PRIMARY KEY (`id`)
) ENGINE=InnoDB AUTO_INCREMENT=44 DEFAULT CHARSET=utf8 COMMENT='权限表';
insert  into `tb_permission`(`id`,`parent_id`,`name`,`enname`,`url`,`description`,`created`,`updated`) values
(37,0,'系统管理','System','/',NULL,'2019-04-04 23:22:54','2019-04-04 23:22:56'),
(38,37,'用户管理','SystemUser','/users/',NULL,'2019-04-04 23:25:31','2019-04-04 23:25:33'),
(39,38,'查看用户','SystemUserView','',NULL,'2019-04-04 15:30:30','2019-04-04 15:30:43'),
(40,38,'新增用户','SystemUserInsert','',NULL,'2019-04-04 15:30:31','2019-04-04 15:30:44'),
(41,38,'编辑用户','SystemUserUpdate','',NULL,'2019-04-04 15:30:32','2019-04-04 15:30:45'),
(42,38,'删除用户','SystemUserDelete','',NULL,'2019-04-04 15:30:48','2019-04-04 15:30:45'),
(44,37,'内容管理','SystemContent','/contents/',NULL,'2019-04-06 18:23:58','2019-04-06 18:24:00'),
(45,44,'查看内容','SystemContentView','/contents/view/**',NULL,'2019-04-06 23:49:39','2019-04-06 23:49:41'),
(46,44,'新增内容','SystemContentInsert','/contents/insert/**',NULL,'2019-04-06 23:51:00','2019-04-06 23:51:02'),
(47,44,'编辑内容','SystemContentUpdate','/contents/update/**',NULL,'2019-04-06 23:51:04','2019-04-06 23:51:06'),
(48,44,'删除内容','SystemContentDelete','/contents/delete/**',NULL,'2019-04-06 23:51:08','2019-04-06 23:51:10');

CREATE TABLE `tb_role_permission` (
  `id` bigint(20) NOT NULL AUTO_INCREMENT,
  `role_id` bigint(20) NOT NULL COMMENT '角色 ID',
  `permission_id` bigint(20) NOT NULL COMMENT '权限 ID',
  PRIMARY KEY (`id`)
) ENGINE=InnoDB AUTO_INCREMENT=43 DEFAULT CHARSET=utf8 COMMENT='角色权限表';
insert  into `tb_role_permission`(`id`,`role_id`,`permission_id`) values
(37,37,37),
(38,37,38),
(39,37,39),
(40,37,40),
(41,37,41),
(42,37,42),
(43,37,44),
(44,37,45),
(45,37,46),
(46,37,47),
(47,37,48);
添加依赖
<dependency>
    <groupId>org.springframework.boot</groupId>
    <artifactId>spring-boot-starter-jdbc</artifactId>
</dependency>
<dependency>
    <groupId>mysql</groupId>
    <artifactId>mysql-connector-java</artifactId>
</dependency>
<dependency>
    <groupId>org.mybatis.spring.boot</groupId>
    <artifactId>mybatis-spring-boot-starter</artifactId>
    <version>2.0.1</version>
</dependency>
<dependency>
    <groupId>org.projectlombok</groupId>
    <artifactId>lombok</artifactId>
</dependency>
在application.yaml配置dataSource
spring:
  datasource:
    type: com.zaxxer.hikari.HikariDataSource
    driver-class-name: com.mysql.cj.jdbc.Driver
    url: jdbc:mysql://localhost:3306/security?useUnicode=true&characterEncoding=utf-8&useSSL=false&serverTimezone=UTC
    username: root
    password: root
    hikari:
      minimum-idle: 5
      idle-timeout: 600000
      maximum-pool-size: 10
      auto-commit: true
      pool-name: MyHikariCP
      max-lifetime: 1800000
      connection-timeout: 30000
      connection-test-query: SELECT 1
实现用户认证逻辑
@Service
public class UserServiceImpl implements UserService {

    @Autowired
    private UserMapper userMapper;
    @Autowired
    private PermissionMapper permissionMapper;

    @Override
    public User getByUsername(String username) {
        return userMapper.getByUsername(username);
    }

    @Override
    public UserDetails loadUserByUsername(String username) throws UsernameNotFoundException {
        //从mysql查询用户
        User user = getByUsername(username);
        List<GrantedAuthority> authorities = new ArrayList<>();
        if(user!=null){
            List<Permission> permissions = permissionMapper.selectByUserId(user.getId());
            //设置权限
            permissions.forEach(permission -> {
                if (permission!=null && !StringUtils.isEmpty(permission.getEnname())){
                    GrantedAuthority grantedAuthority = new SimpleGrantedAuthority(permission.getEnname());
                    authorities.add(grantedAuthority);
                }
            });
            // 封装成UserDetails的实现类
            return new org.springframework.security.core.userdetails.User(
                    user.getUsername(),user.getPassword(),authorities);
        }else {
            throw new UsernameNotFoundException("用户名不存在");
        }

    }
}
配置spring security
@Configuration
public class WebSecurityConfig extends WebSecurityConfigurerAdapter {
    @Autowired
    private UserService userService;

    @Override
    protected void configure(AuthenticationManagerBuilder auth) throws Exception {
        //设置UserDetailsService的实现类
        auth.userDetailsService(userService);
    }

    @Bean
    public PasswordEncoder passwordEncoder(){
        return new BCryptPasswordEncoder();
    }
}
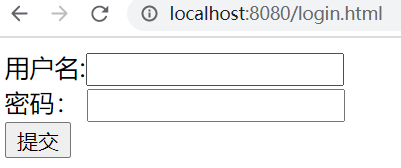
自定义登录页面
默认登录页面通过DefaultLoginPageGeneratingFilter#generateLoginPageHtml生成
编写登录页面
<!DOCTYPE html>
<html lang="en">
<head>
    <meta charset="UTF-8">
    <title>Title</title>
</head>
<body>
    <form action="/user/login" method="post">
        用户名:<input type="text" name="username"/><br/>
        密码: <input type="password" name="password"/><br/>
        <input type="submit" value="提交"/>
    </form>
</body>
</html>
自定义登录页面配置
@Override
protected void configure(HttpSecurity http) throws Exception {
    http.formLogin()  //表单提交
        .loginPage("/login.html") //自定义登录页面
        .loginProcessingUrl("/user/login")  //登录访问路径,必须和表单提交接口一样
        .defaultSuccessUrl("/admin/index")   //认证成功之后跳转的路径
        .and().authorizeRequests()
        //设置哪些路径可以直接访问,不需要认证
        .antMatchers("/user/login","/login.html").permitAll()
        .anyRequest().authenticated()  //需要认证
        .and().csrf().disable(); //关闭csrf防护

}
测试
访问/admin/demo直接返回结果,不用认证
访问/admin/index跳转到自定义登录界面
常见问题:
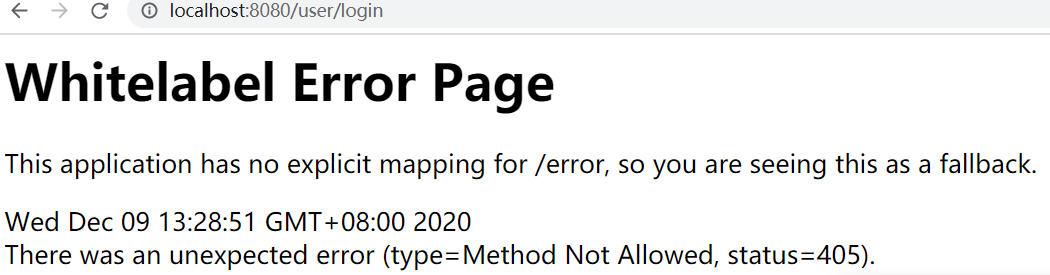
原因是登录只接受Post请求
如下,通过successForwardUrl和failureForwardUrl设置登录成功和失败后的跳转页面
@Override
protected void configure(HttpSecurity http) throws Exception {

    http.formLogin() //表单提交
        .loginPage("/login.html") //自定义登录页面
        .loginProcessingUrl("/user/login")  //登录访问路径,必须和表单提交接口一样
        .successForwardUrl("/main")   //认证成功之后转发的路径,必须是Post请求
        .failureForwardUrl("/toerror")  //认证失败之后转发的路径,必须是Post请求

        .and().authorizeRequests()
        //设置哪些路径可以直接访问,不需要认证
        .antMatchers("/user/login","/login.html","/error.html").permitAll()
        .anyRequest().authenticated()  //需要认证
        .and().csrf().disable(); //关闭csrf防护

}

//
@Controller
public class LoginController {

    @RequestMapping("/main")
    public String main() {
        return "redirect:/main.html";
    }

    @RequestMapping("/toerror")
    public String error() {
        return "redirect:/error.html";
    }
}
自定义用户名和密码参数名
当进行登录时会执行 UsernamePasswordAuthenticationFilter 过滤器
- usernamePasrameter :账户参数名
- passwordParameter :密码参数名
- postOnly=true :默认情况下只允许POST请求
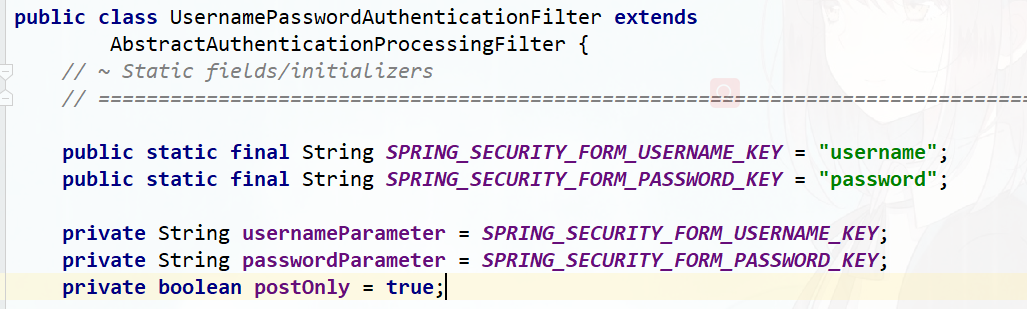
可以通过usernameParameter和passwordParameter设置,必须保证和前端表单的name值一致
http.formLogin() //表单提交
                .usernameParameter("username1212")
                .passwordParameter("password1212")
自定义登录成功处理器
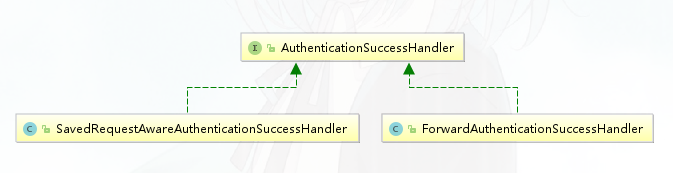
比如想实现登录成功后重定向其他页面,可以利用AuthenticationSuccessHandler接口实现自定义的认证成功控制器。
public class MyAuthenticationSuccessHandler implements AuthenticationSuccessHandler {

    private String redirectUrl;

    public MyAuthenticationSuccessHandler(String redirectUrl) {
        this.redirectUrl = redirectUrl;
    }

    @Override
    public void onAuthenticationSuccess(HttpServletRequest request, HttpServletResponse response, Authentication authentication) throws IOException, ServletException {
        response.sendRedirect(redirectUrl);
    }
}

//
http.formLogin() //表单提交
            .loginPage("/login.html") //自定义登录页面
            .loginProcessingUrl("/user/login")  //登录访问路径,必须和表单提交接口一样
            .successHandler(new MyAuthenticationSuccessHandler("/main.html"))
自定义登录失败处理器
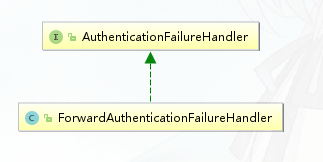
同样的,当登录认证失败后,想做一些事情,可以实现AuthenticationFailureHandler接口。
public class MyAuthenticationFailureHandler implements AuthenticationFailureHandler {

    private String redirectUrl;

    public MyAuthenticationFailureHandler(String redirectUrl) {
        this.redirectUrl = redirectUrl;
    }

    @Override
    public void onAuthenticationFailure(HttpServletRequest request, HttpServletResponse response, AuthenticationException exception) throws IOException, ServletException {
        response.sendRedirect(redirectUrl);
    }
}

http.formLogin() //表单提交
            .loginPage("/login.html") //自定义登录页面
            .loginProcessingUrl("/user/login")  //登录访问路径,必须和表单提交接口一样
            .successHandler(new MyAuthenticationSuccessHandler("/main.html"))
            .failureHandler(new MyAuthenticationFailureHandler("/error.html"))
会话管理(Session)
用户认证通过后,为了避免用户的每次操作都进行认证可将用户的信息保存在会话中。spring security提供会话管理,认证通过后将身份信息放入SecurityContextHolder上下文,SecurityContext与当前线程进行绑定,方便获取用户身份。
获取用户身份信息
@GetMapping("/index")
public String index() {
    String username = getUsername();
    return username + "登录成功";
}

private String getUsername(){
    // 获取当前登录的用户信息
    Authentication authentication = SecurityContextHolder.getContext().getAuthentication();
    if(!authentication.isAuthenticated()){
        return null;
    }
    Object principal = authentication.getPrincipal();
    String username = null;
    if (principal instanceof UserDetails) {
        username =((UserDetails)principal).getUsername();
    } else {
        username = principal.toString();
    }
    return username;
}
会话控制
我们可以通过以下选项准确控制会话何时创建以及Spring Security如何与之交互:
| 机制 | 描述 |
|---|---|
| always | 如果session不存在总是需要创建 |
| ifRequired | 如果需要就创建一个session(默认)登录时 |
| never | Spring Security 将不会创建session,但是如果应用中其他地方创建了session,那么Spring Security将会使用它 |
| stateless | Spring Security将绝对不会创建session,也不使用session。并且它会暗示不使用cookie,所以每个请求都需要重新进行身份验证。这种无状态架构适用于REST API及其无状态认证机制。 |
@Override
protected void configure(HttpSecurity http) throws Exception {
    http.sessionManagement()
    .sessionCreationPolicy(SessionCreationPolicy.IF_REQUIRED)
}
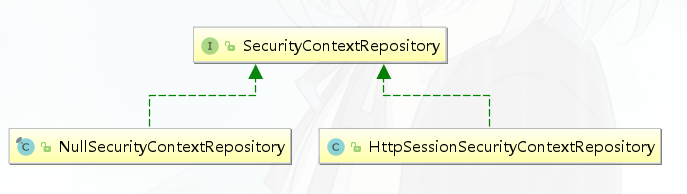
默认情况下,Spring Security会为每个登录成功的用户会新建一个Session,就是ifRequired 。在执行认证过程之前,spring security将运行SecurityContextPersistenceFilter过滤器负责存储安全请求上下文,上下文根据策略进行存储,默认为HttpSessionSecurityContextRepository ,其使用http session作为存储器。
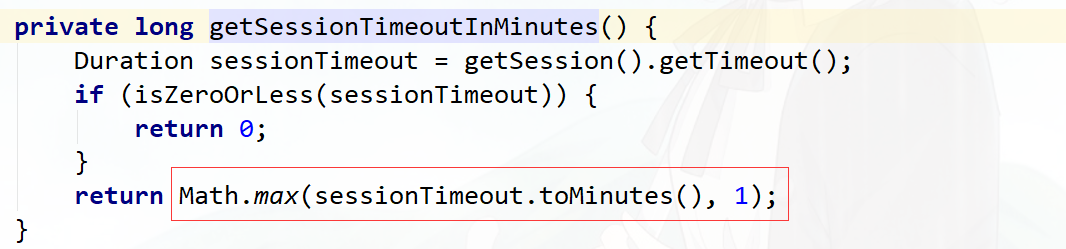
会话超时
可以在sevlet容器中设置Session的超时时间,如下设置Session有效期为600s; spring boot 配置文件:
server.servlet.session.timeout=600s
注意:session最低60s,参考源码TomcatServletWebServerFactory#configureSession:
session超时之后,可以通过Spring Security 设置跳转的路径。
http.sessionManagement()
.invalidSessionUrl("/session/invalid");
@RestController
@RequestMapping("/session")
public class SessionController {

    @GetMapping("/invalid")
    @ResponseStatus(code = HttpStatus.UNAUTHORIZED)
    public String sessionInvalid() {
        return "session失效";
    }
}
会话并发控制
用户在这个手机登录后,他又在另一个手机登录相同账户,对于之前登录的账户是否需要被挤兑,或者说在第二次登录时限制它登录,更或者像腾讯视频VIP账号一样,最多只能五个人同时登录,第六个人限制登录。
- maximumSessions:最大会话数量,设置为1表示一个用户只能有一个会话
- expiredSessionStrategy:会话过期策略
http.sessionManagement()
                .invalidSessionUrl("/session/invalid")
                .maximumSessions(1)
                .expiredSessionStrategy(new MyExpiredSessionStrategy());
public class MyExpiredSessionStrategy implements SessionInformationExpiredStrategy {
    @Override
    public void onExpiredSessionDetected(SessionInformationExpiredEvent event) throws IOException, ServletException {
        HttpServletResponse response = event.getResponse();
        response.setContentType("application/json;charset=UTF-8");
        response.getWriter().write("您已被挤兑下线!");
    }
}
测试
- 使用chrome浏览器,先登录,再访问http://localhost:8080/admin/index
- 使用ie浏览器,再登录,再访问http://localhost:8080/admin/index
- 使用chrome浏览器,重新访问http://localhost:8080/admin/index,会执行expiredSessionStrategy,页面上显示”您已被挤兑下线!“
阻止用户第二次登录
sessionManagement也可以配置 maxSessionsPreventsLogin:boolean值,当达到maximumSessions设置的最大会话个数时阻止登录。
http.sessionManagement()
                .invalidSessionUrl("/session/invalid")
                .maximumSessions(1)
                .expiredSessionStrategy(new MyExpiredSessionStrategy())
                .maxSessionsPreventsLogin(true);
集群session
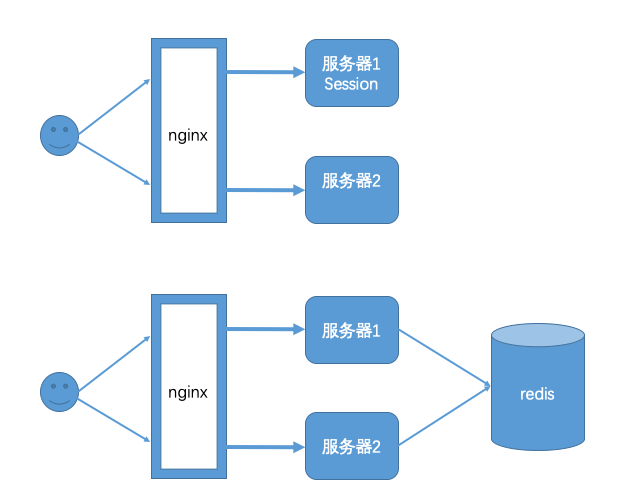
实际场景中一个服务会至少有两台服务器在提供服务,在服务器前面会有一个nginx做负载均衡,用户访问nginx,nginx再决定去访问哪一台服务器。当一台服务宕机了之后,另一台服务器也可以继续提供服务,保证服务不中断。如果我们将session保存在Web容器(比如tomcat)中,如果一个用户第一次访问被分配到服务器1上面需要登录,当某些访问突然被分配到服务器二上,因为服务器二上没有用户在服务器一上登录的会话session信息,服务器二还会再次让用户登录,用户已经登录了还让登录就感觉不正常了。解决这个问题的思路是用户登录的会话信息不能再保存到Web服务器中,而是保存到一个单独的库(redis、mongodb、mysql等)中,所有服务器都访问同一个库,都从同一个库来获取用户的session信息,如用户在服务器一上登录,将会话信息保存到库中,用户的下次请求被分配到服务器二,服务器二从库中检查session是否已经存在,如果存在就不用再登录了,可以直接访问服务了。
引入spring session依赖
<dependency>
    <groupId>org.springframework.session</groupId>
    <artifactId>spring-session-data-redis</artifactId>
</dependency>

<dependency>
    <groupId>redis.clients</groupId>
    <artifactId>jedis</artifactId>
    <version>3.1.0</version>
</dependency>
修改application.yaml
spring:
  session:
    store-type: redis
  redis:
    host: localhost
    port: 6379

server:
  port: 8080
  servlet:
    session:
      timeout: 600
测试
启动两个服务8080,8081 ,其中一个登录后访问http://localhost:8080/admin/index,另外一个不需要登录就可以访问
缺点:
Spring Session + Redis实现分布式Session共享 有个非常大的缺陷, 无法实现跨域名共享session , 只能在单台服务器上共享session , 因为是依赖cookie做的 , cookie 无法跨域。 Spring Session一般是用于多台服务器负载均衡时共享Session的,都是同一个域名,不会跨域。
安全会话cookie
我们可以使用httpOnly和secure标签来保护我们的会话cookie:
- httpOnly:如果为true,那么浏览器脚本将无法访问cookie
- secure:如果为true,则cookie将仅通过HTTPS连接发送
spring boot配置文件:
server.servlet.session.cookie.http‐only=true
server.servlet.session.cookie.secure=true
RememberMe实现
Spring Security 中 Remember Me 为“记住我”功能,用户只需要在登录时添加 remember-me复选框,取值为true。Spring Security 会自动把用户信息存储到数据源中,以后就可以不登录进行访问。
RememberMe配置
@Autowired
public DataSource dataSource;

public PersistentTokenRepository persistentTokenRepository(){
    JdbcTokenRepositoryImpl jdbcTokenRepository = new JdbcTokenRepositoryImpl();
    //设置数据源
    jdbcTokenRepository.setDataSource(dataSource);
    return jdbcTokenRepository;
}

@Override
protected void configure(HttpSecurity http) throws Exception {

//记住我
http.rememberMe()
    .tokenRepository(persistentTokenRepository())//设置持久化仓库
    .tokenValiditySeconds(3600) //超时时间,单位s 默认两周
    .userDetailsService(userService);  //设置自定义登录逻辑
}
创建数据表persistent_logins
create table persistent_logins (
	username varchar(64) not null,
	series varchar(64) primary key,
	token varchar(64) not null,
	last_used timestamp not null
)
在客户端登录页面中添加 remember-me 的复选框
<form action="/login" method="post">
用户名:<input type="text" name="username" /><br/>
密码:<input type="password" name="password" /><br/>
<input type="checkbox" name="remember-me" value="true"/><br/>
<input type="submit" value="登录" />
</form>
测试
登录后关闭浏览器,再次打开浏览器访问http://localhost:8080/main.html,发现不用重新登录了
退出登录
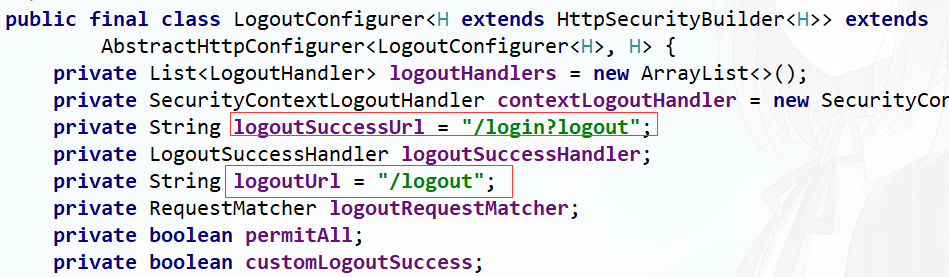
Spring security默认实现了logout退出,用户只需要向 Spring Security 项目中发送 /logout 退出请求即可。
默认的退出 url 为 /logout ,退出成功后跳转到 /login?logout 。
自定义退出逻辑
如果不希望使用默认值,可以通过下面的方法进行修改。
http.logout()
.logoutUrl("/logout")
.logoutSuccessUrl("/login.html");
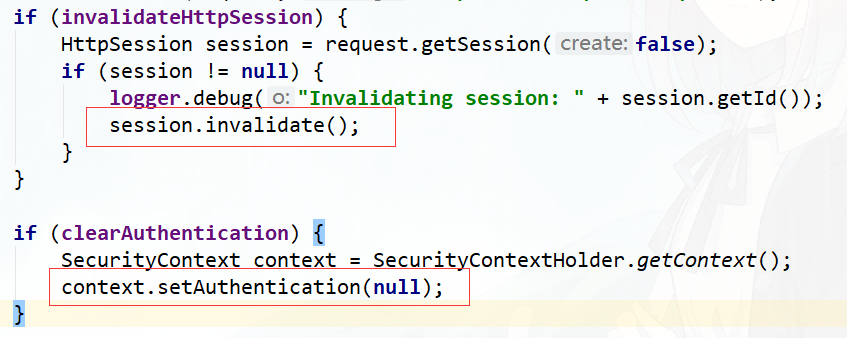
SecurityContextLogoutHandler
当退出操作出发时,将发生:
- 销毁HTTPSession 对象
- 清除认证状态
- 跳转到 /login.html

LogoutSuccessHandler
退出成功处理器,实现 LogoutSuccessHandler 接口 ,可以自定义退出成功处理逻辑。
CSRF
CSRF(Cross-site request forgery)跨站请求伪造,也被称为“OneClick Attack” 或者 Session Riding。通过伪造用户请求访问受信任站点的非法请求访问。
跨域:只要网络协议,ip 地址,端口中任何一个不相同就是跨域请求。
客户端与服务进行交互时,由于 http 协议本身是无状态协议,所以引入了cookie进行记录客户端身份。在cookie中会存放session id用来识别客户端身份的。在跨域的情况下,session id 可能被第三方恶意劫持,通过这个 session id 向服务端发起请求时,服务端会认为这个请求是合法的,可能发生很多意想不到的事情。
防御CSRF攻击策略
- 验证 HTTP Referer 字段
- 在请求地址中添加 token 并验证
- 在 HTTP 头中自定义属性并验证
从 Spring Security4开始CSRF防护默认开启,默认会拦截请求,进行CSRF处理。CSRF为了保证不是其他第三方网站访问,要求访问时携带参数名为 _csrf 值为token(token 在服务端产生,在渲染请求页面时埋入页面)的内容,如果token和服务端的token匹配成功,则正常访问。
修改login.html
<!DOCTYPE html>
<html xmlns="http://www.w3.org/1999/xhtml"
      xmlns:th="http://www.thymeleaf.org">
<head>
    <meta charset="UTF-8">
    <title>Title</title>
</head>
<body>
    <form action="/login" method="post">
        <input type="hidden" th:value="${_csrf.token}" name="_csrf" th:if="${_csrf}"/>
        用户名:<input type="text" name="username"/><br/>
        密码: <input type="password" name="password"/><br/>
        <input type="submit" value="提交"/>
    </form>
</body>
</html>
修改配置类
//关闭csrf防护
// http.csrf().disable();
2.2 认证原理
Spring Security是如何完成身份认证的?
用户名和密码被过滤器获取到,封装成
Authentication,通常情况下是UsernamePasswordAuthenticationToken这个实现类。AuthenticationManager身份管理器负责验证这个Authentication认证成功后,
AuthenticationManager身份管理器返回一个被填充满了信息的(包括上面提到的权限信息,身份信息,细节信息,但密码通常会被移除)Authentication实例。SecurityContextHolder安全上下文容器将第3步填充了信息的Authentication,通过SecurityContextHolder.getContext().setAuthentication(…)方法,设置到其中。
public class AuthenticationExample {
private static AuthenticationManager am = new SampleAuthenticationManager();
public static void main(String[] args) throws Exception {
BufferedReader in = new BufferedReader(new InputStreamReader(System.in));
while (true) {
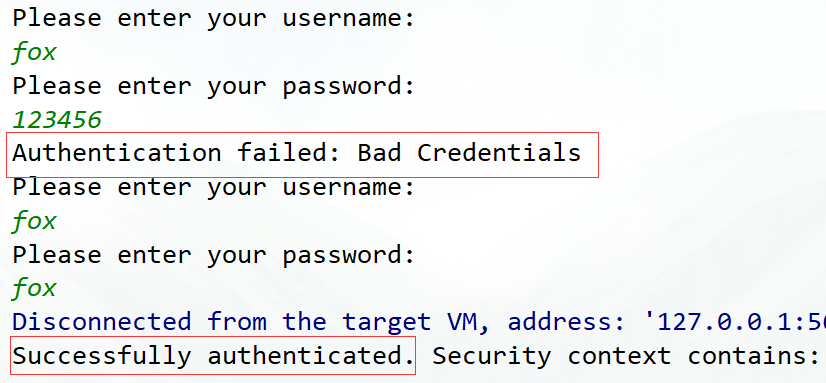
System.out.println("Please enter your username:");
String name = in.readLine();
System.out.println("Please enter your password:");
String password = in.readLine();
try {
// 封装认证信息,未认证通过
Authentication request = new UsernamePasswordAuthenticationToken(name, password);
// 认证逻辑
Authentication result = am.authenticate(request);
//当前线程绑定认证信息
SecurityContextHolder.getContext().setAuthentication(result);
break;
} catch (AuthenticationException e) {
System.out.println("Authentication failed: " + e.getMessage());
}
}
System.out.println("Successfully authenticated. Security context contains: " +
SecurityContextHolder.getContext().getAuthentication());
}
}
class SampleAuthenticationManager implements AuthenticationManager {
static final List<GrantedAuthority> AUTHORITIES = new ArrayList<GrantedAuthority>();
static {
AUTHORITIES.add(new SimpleGrantedAuthority("ROLE_USER"));
}
@Override
public Authentication authenticate(Authentication auth) throws AuthenticationException {
// 判断条件,用户名和密码是否相同
if (auth.getName().equals(auth.getCredentials())) {
// 封装认证信息,认证已通过
return new UsernamePasswordAuthenticationToken(auth.getName(),
auth.getCredentials(), AUTHORITIES);
}
throw new BadCredentialsException("Bad Credentials");
}
}
测试
认证流程
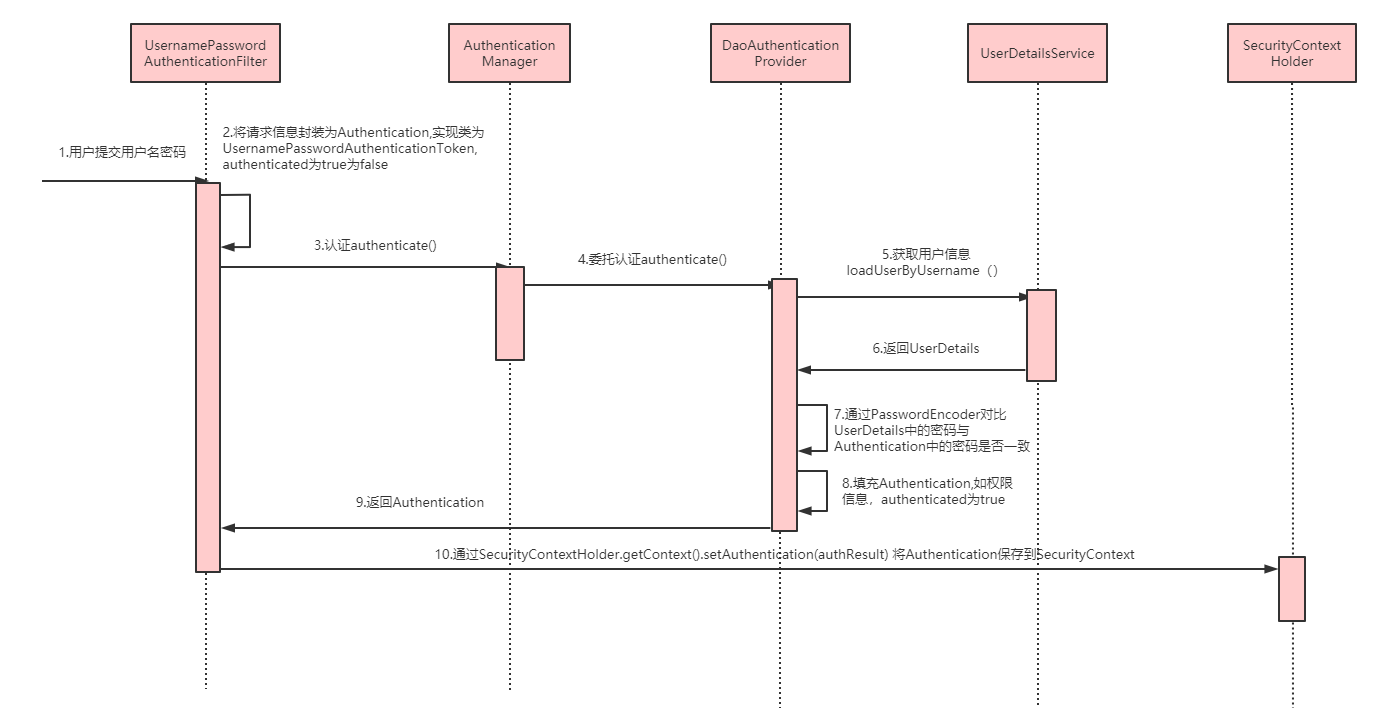
相关接口
AuthenticationManager
认证管理器,用于处理一个认证请求,提供了认证方法的入口
public interface AuthenticationManager {

	Authentication authenticate(Authentication authentication)
			throws AuthenticationException;
}
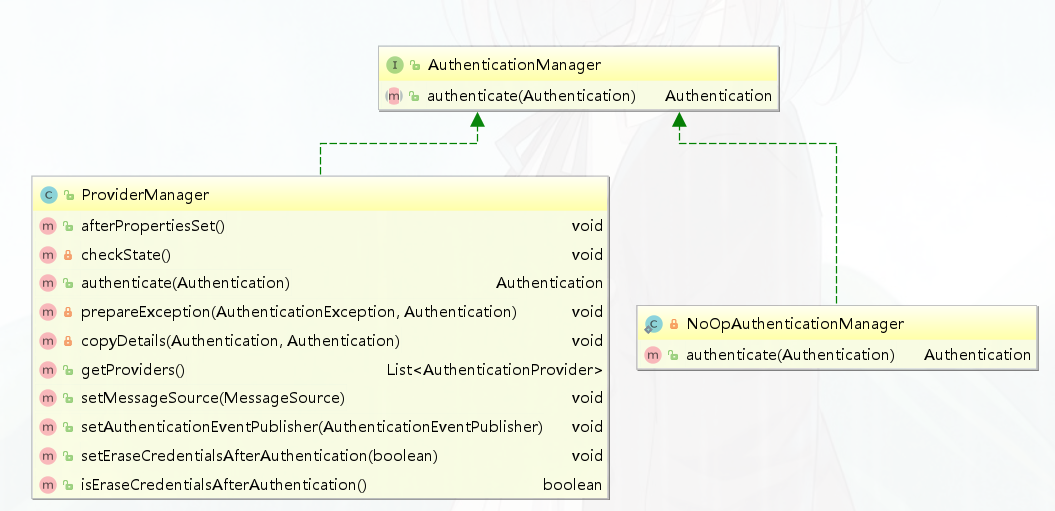
ProviderManager
ProviderManager是 AuthenticationManager 的一个实现类,提供了基本的认证逻辑和方法;它包含了一个List<AuthenticationProvider>属性,通过 AuthenticationProvider 接口来扩展出多种认证方式,实际上这是委托者模式的应用(Delegate)。
public interface AuthenticationProvider {

	Authentication authenticate(Authentication authentication)
			throws AuthenticationException;

	boolean supports(Class<?> authentication);
}
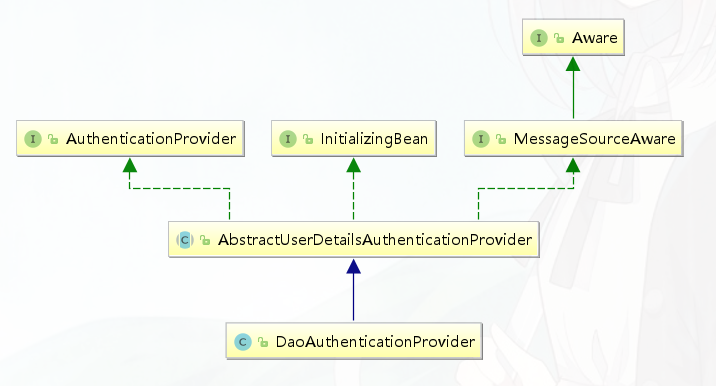
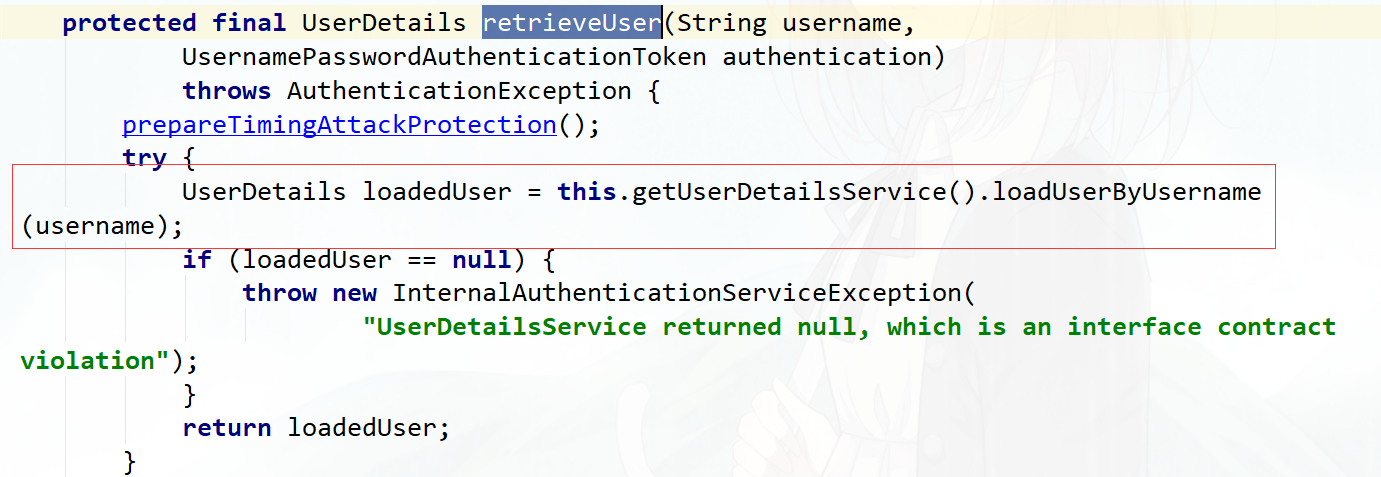
在Spring Security中,提交的用户名和密码,被封装成UsernamePasswordAuthenticationToken,而根据用户名加载用户的任务则是交给了UserDetailsService,在DaoAuthenticationProvider中,对应的方法便是retrieveUser,返回一个UserDetails。
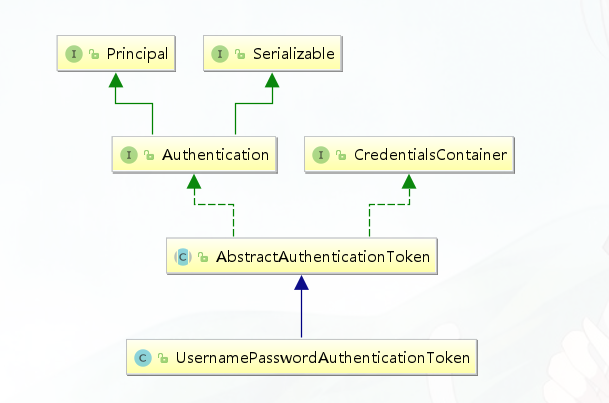
Authentication
Authentication在spring security中是最高级别的身份/认证的抽象,由这个顶级接口,我们可以得到用户拥有的权限信息列表,密码,用户细节信息,用户身份信息,认证信息。
UsernamePasswordAuthenticationToken
UsernamePasswordAuthenticationToken实现了 Authentication主要是将用户输入的用户名和密码进行封装,并供给 AuthenticationManager 进行验证;验证完成以后将返回一个认证成功的 Authentication 对象
public interface Authentication extends Principal, Serializable {
	//1.权限信息列表,可使用AuthorityUtils.commaSeparatedStringToAuthorityList("admin,ROLE_ADMIN")返回字符串权限集合
	Collection<? extends GrantedAuthority> getAuthorities();
	//2.密码信息,用户输入的密码字符串,在认证过后通常会被移除,用于保障安全。
	Object getCredentials();
	//3.认证时包含的一些信息,web应用中的实现接口通常为 WebAuthenticationDetails,它记录了访问者的ip地址和sessionId的值。
	Object getDetails();
	//4.身份信息,大部分情况下返回的是UserDetails接口的实现类
	Object getPrincipal();
	//5.是否被认证,认证为true
	boolean isAuthenticated();
	//6.设置是否能被认证
	void setAuthenticated(boolean isAuthenticated) throws IllegalArgumentException;
}
SecurityContextHolder
用于存储安全上下文(security context)的信息,SecurityContextHolder默认使用ThreadLocal 策略来存储认证信息。
// 获取当前用户名
Object principal = SecurityContextHolder.getContext().getAuthentication().getPrincipal();

if (principal instanceof UserDetails) {
    String username = ((UserDetails)principal).getUsername();
} else {
    String username = principal.toString();
}
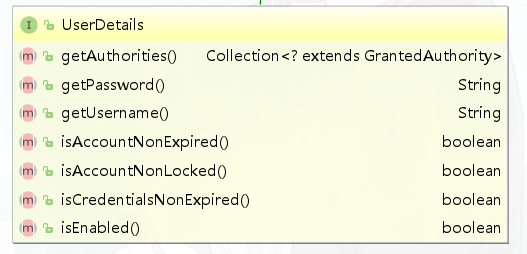
UserDetailsService
public interface UserDetailsService {
   // 根据用户名加载用户信息
   UserDetails loadUserByUsername(String username) throws UsernameNotFoundException;
}
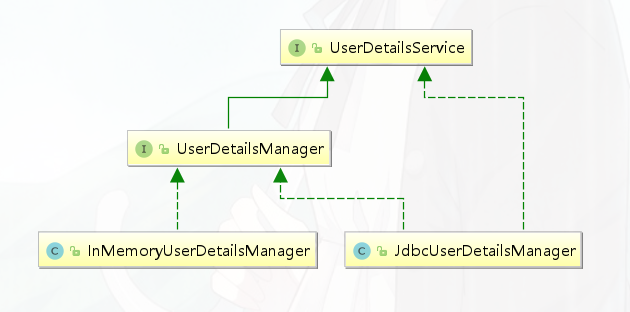
Spring Security内置了两种 UserDetailsManager实现
实际项目中,我们更多采用调用 AuthenticationManagerBuilder#userDetailsService(userDetailsService) 方法,使用自定义实现的 UserDetailsService实现类,更加灵活且自由的实现认证的用户信息的读取。
@Override
protected void configure(AuthenticationManagerBuilder auth) throws Exception {
	 auth.userDetailsService(new UserDetailsServiceImpl());
}
UserDetails
用户信息核心接口,默认实现类org.springframework.security.core.userdetails.User
PasswordEncoder
public interface PasswordEncoder {

	/**
	 * 表示把密码按照特定的解析规则进行解析
	 */
	String encode(CharSequence rawPassword);

	/**
	 * 表示验证从存储中获取的编码密码与编码后提交的原始密码是否匹配。如果密码匹配,则返回 true;如果不匹配,	 * 则返回 false。第一个参数表示需要被解析的密码。第二个参数表示存储的密码
	 */
	boolean matches(CharSequence rawPassword, String encodedPassword);

}
BCryptPasswordEncoder 是 Spring Security 官方推荐的密码解析器 。BCryptPasswordEncoder 是对 bcrypt 强散列方法的具体实现,是基于Hash算法实现的单向加密,可以通过strength控制加密强度,默认 10。
@Test
public void test(){
    String passwd = BCrypt.hashpw("123",BCrypt.gensalt());
    System.out.println(passwd);

    boolean checkpw = BCrypt.checkpw("123", passwd);
    System.out.println(checkpw);
}
2.3 用户授权(访问控制)
授权的方式包括 web授权和方法授权,web授权是通过 url拦截进行授权,方法授权是通过 方法拦截进行授权。他 们都会调用accessDecisionManager进行授权决策,若为web授权则拦截器为FilterSecurityInterceptor;若为方 法授权则拦截器为MethodSecurityInterceptor。如果同时通过web授权和方法授权则先执行web授权,再执行方 法授权,最后决策通过,则允许访问资源,否则将禁止访问。
web授权
Spring Security可以通过 http.authorizeRequests() 对web请求进行授权保护 ,Spring Security使用标准Filter建立了对web请求的拦截,最终实现对资源的授权访问。
http.authorizeRequests()
            //设置哪些路径可以直接访问,不需要认证
            .antMatchers("/user/login","/login.html").permitAll()
            .anyRequest().authenticated();  //需要认证才能访问
访问控制的url匹配
在配置类中http.authorizeRequests() 主要是对url进行控制。配置顺序会影响之后授权的效果,越是具体的应该放在前面,越是笼统的应该放到后面。
anyRequest()
表示匹配所有的请求。一般情况下此方法都会使用,设置全部内容都需要进行认证,会放在最后。
.anyRequest().authenticated()
方法定义如下:
public C antMatchers(String... antPatterns)
参数是不定向参数,每个参数是一个 ant 表达式,用于匹配 URL规则。
ANT通配符有三种:
| 通配符 | 说明 |
|---|---|
| ? | 匹配任何单字符 |
| * | 匹配0或者任意数量的字符 |
| ** | 匹配0或者更多的目录 |
在实际项目中经常需要放行所有静态资源:
// 放行 js和css 目录下所有的文件
.antMatchers("/js/**","/css/**").permitAll()
// 只要是.js 文件都放行
.antMatchers("/**/*.js").permitAll()
regexMatchers()
使用正则表达式进行匹配。
//所有以.js 结尾的文件都被放行
.regexMatchers( ".+[.]js").permitAll()
无论是 antMatchers() 还是 regexMatchers() 都具有两个参数的方法,其中第一个参数都是HttpMethod ,表示请求方式,当设置了 HttpMethod 后表示只有设定的特定的请求方式才执行对应的权限设置。
.antMatchers(HttpMethod.POST,"/admin/demo").permitAll()
.regexMatchers(HttpMethod.GET,".+[.]jpg").permitAll()
mvcMatchers()
适用于配置了 servletPath 的情况。 servletPath 就是所有的 URL 的统一前缀。在 SpringBoot 整合SpringMVC 的项目中可以在application.properties 中添加下面内容设置 ServletPath。
spring.mvc.servlet.path=/web
在 Spring Security 的配置类中配置 .servletPath() 是 mvcMatchers()返回值特有的方法,antMatchers()和 regexMatchers()没有这个方法。在 servletPath() 中配置了 servletPath 后,mvcMatchers()直接写 SpringMVC 中@RequestMapping()中设置的路径即可。
.mvcMatchers("/admin/demo").servletPath("/web").permitAll()
如果不习惯使用 mvcMatchers()也可以使用 antMatchers(),下面代码和上面代码是等效的:
.antMatchers("/web/admin/demo").permitAll()
RequestMatcher接口
RequestMatcher是Spring Security Web的一个概念模型接口,用于抽象建模对HttpServletRequest请求的匹配器这一概念。Spring Security内置提供了一些RequestMatcher实现类:
| 实现类 | 介绍 |
|---|---|
AnyRequestMatcher | 匹配任何请求 |
AntPathRequestMatcher | 使用ant风格的路径匹配模板匹配请求 |
ELRequestMatcher | 使用EL表达式匹配请求 |
IpAddressMatcher | 基于IP地址匹配请求,支持IPv4和IPv6 |
MediaTypeRequestMatcher | 基于MediaType匹配请求 |
RegexRequestMatcher | 基于正则表达式匹配请求 |
RequestHeaderRequestMatcher | 基于头部值比较匹配请求 |
AndRequestMatcher | and组合多个RequestMatcher |
OrRequestMatcher | or组合多个RequestMatcher |
NegatedRequestMatcher | not操作一个RequestMatcher |
MvcRequestMatcher | 使用Spring MVC的HandlerMappingIntrospector匹配请求 |
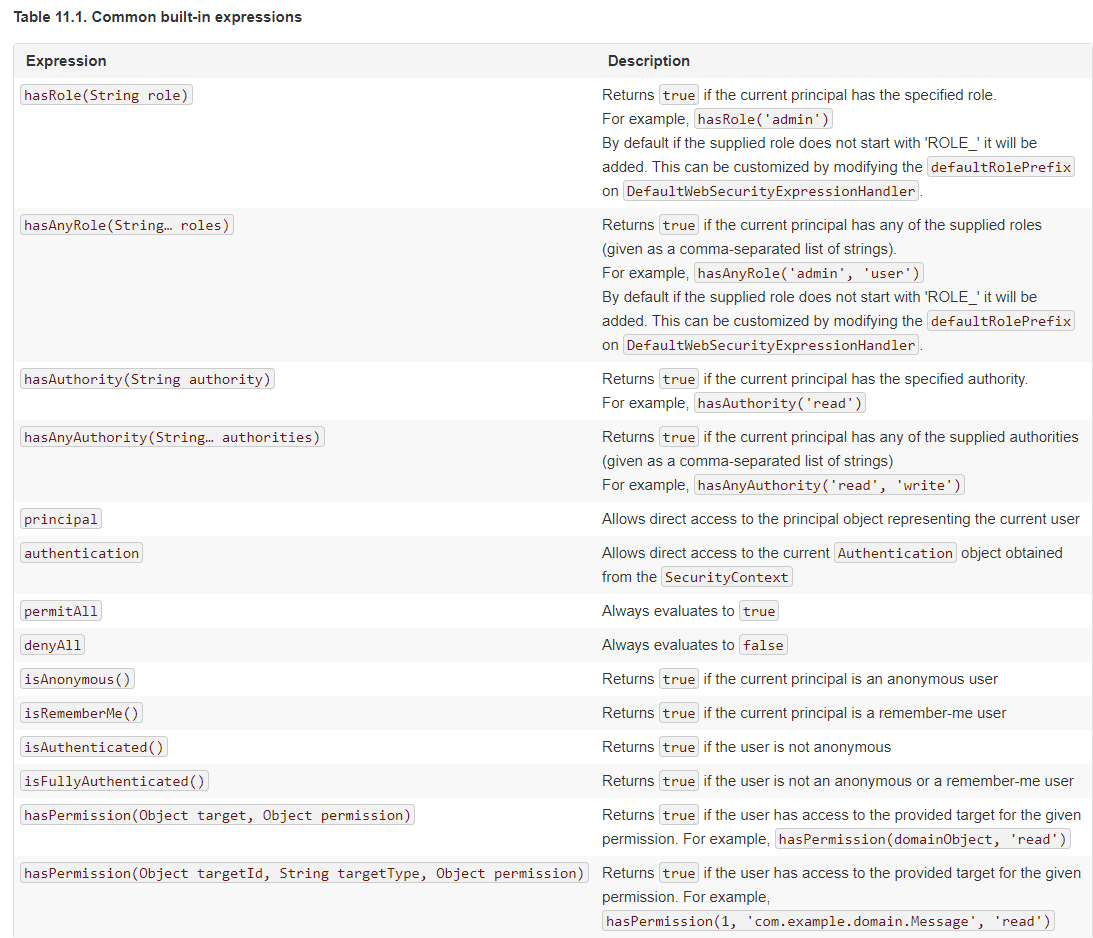
内置的访问控制
【常用】
#permitAll()方法,所有用户可访问。【常用】
#denyAll()方法,所有用户不可访问。【常用】
#authenticated()方法,登录用户可访问。#anonymous()方法,无需登录,即匿名用户可访问。#rememberMe()方法,通过 remember me登录的用户可访问。#fullyAuthenticated()方法,非 remember me 登录的用户可访问。#hasIpAddress(String ipaddressExpression)方法,来自指定 IP 表达式的用户可访问。【常用】
#hasRole(String role)方法, 拥有指定角色的用户可访问,角色将被增加 “ROLE_” 前缀。【常用】
#hasAnyRole(String... roles)方法,拥有指定任一角色的用户可访问。【常用】
#hasAuthority(String authority)方法,拥有指定权限(authority)的用户可访问。【常用】
#hasAuthority(String... authorities)方法,拥有指定任一权限(authority)的用户可访问。【最牛】
#access(String attribute)方法,当 Spring EL 表达式的执行结果为true时,可以访问。
基于权限的访问控制
除了之前讲解的内置权限控制。Spring Security 中还支持很多其他权限控制。这些方法一般都用于用户已经被认证后,判断用户是否具有特定的要求。
hasAuthority(String)
判断用户是否具有特定的权限,用户的权限是在自定义登录逻辑中创建 User 对象时指定的。权限名称大小写敏感
return new User("fox", pw, AuthorityUtils.commaSeparatedStringToAuthorityList("admin,user"));//admin,user就是用户的权限
在配置类中通过 hasAuthority(“admin”)设置具有 admin 权限时才能访问。
.antMatchers("/admin/demo").hasAuthority("admin")
否则报403错误
hasAnyAuthority(String ...)
如果用户具备给定权限中某一个,就允许访问。
.antMatchers("/admin/demo").hasAnyAuthority("admin","System")
基于角色的访问控制
hasRole(String)
如果用户具备给定角色就允许访问,否则出现 403。参数取值来源于自定义登录逻辑 UserDetailsService 实现类中创建 User 对象时给 User 赋予的授权。 在给用户赋予角色时角色需要以: ROLE_开头 ,后面添加角色名称。例如:ROLE_admin 其中 admin是角 色名,ROLE_是固定的字符开头。
return new User("fox", pw, AuthorityUtils.commaSeparatedStringToAuthorityList("ROLE_admin,user"));//给用户赋予admin角色
使用 hasRole()时参数也只写admin 即可,否则启动报错。
.antMatchers("/admin/demo").hasRole("admin")
hasAnyRole(String ...)
如果用户具备给定角色的任意一个,就允许被访问 。
hasIpAddress(String)
如果请求是指定的 IP 就运行访问。 可以通过 request.getRemoteAddr() 获取 ip 地址。需要注意的是在本机进行测试时 localhost 和 127.0.0.1 输出的 ip地址是不一样的。
//  localhost --> getRemoteAddr:  0:0:0:0:0:0:0:1
.antMatchers("/admin/demo").hasIpAddress("127.0.0.1")
自定义403处理方案
使用 Spring Security 时经常会看见 403(无权限)。Spring Security 支持自定义权限受限处理,需要实现 AccessDeniedHandler接口
public class MyAccessDeniedHandler implements AccessDeniedHandler {
    @Override
    public void handle(HttpServletRequest request, HttpServletResponse response, AccessDeniedException accessDeniedException) throws IOException, ServletException {
        response.setStatus(HttpServletResponse.SC_FORBIDDEN);
        response.setHeader("Content-Type", "application/json;charset=utf-8");
        PrintWriter out = response.getWriter();
        out.write("{\"status\":\"error\",\"msg\":\"权限不足,请联系管理员!\"}");
        out.flush();
        out.close();
    }
}
在配置类中设置访问受限后交个MyAccessDeniedHandler处理
http.exceptionHandling()
     .accessDeniedHandler(new MyAccessDeniedHandler());
基于表达式的访问控制
access(表达式)
之前学习的登录用户权限判断实际上底层实现都是调用access(表达式)
https://docs.spring.io/spring-security/site/docs/5.2.7.RELEASE/reference/htmlsingle/#tech-intro-access-control
表达式根对象的基类是SecurityExpressionRoot,提供了一些在web和方法安全性中都可用的通用表达式。
可以通过 access() 实现和之前学习的权限控制完成相同的功能。
.antMatchers("/user/login","/login.html").access("permitAll")
.antMatchers("/admin/demo").access("hasAuthority('System')")
自定义方法
判断登录用户是否具有访问当前 URL 的权限。
@Component
public class MySecurityExpression implements MySecurityExpressionOperations{
    @Override
    public boolean hasPermission(HttpServletRequest request, Authentication authentication) {
        // 获取主体
        Object obj = authentication.getPrincipal();
        if (obj instanceof UserDetails){
            UserDetails userDetails = (UserDetails) obj;
            //
            String name = request.getParameter("name");
            //获取权限
            Collection<? extends GrantedAuthority> authorities = userDetails.getAuthorities();
            //判断name值是否在权限中
            return authorities.contains(new SimpleGrantedAuthority(name));
        }
        return false;
    }
}
在 access 中通过bean的beanName.方法(参数)的形式进行调用:
.anyRequest().access("@mySecurityExpression.hasPermission(request,authentication)")
方法授权
基于注解的访问控制
Spring Security在方法的权限控制上支持三种类型的注解,JSR-250注解、@Secured注解和支持表达式的注解。这三种注解默认都是没有启用的,需要通过@EnableGlobalMethodSecurity来进行启用。
这些注解可以写到 Service 接口或方法上,也可以写到 Controller或 Controller 的方法上。通常情况下都是写在控制器方法上的,控制接口URL是否允许被访问。
JSR-250注解
@RolesAllowed
表示访问对应方法时所应该具有的角色。其可以标注在类上,也可以标注在方法上,当标注在类上时表示其中所有方法的执行都需要对应的角色,当标注在方法上表示执行该方法时所需要的角色,当方法和类上都使用了@RolesAllowed进行标注,则方法上的@RolesAllowed将覆盖类上的@RolesAllowed,即方法上@RolesAllowed将对当前方法起作用。@RolesAllowed的值是由角色名称组成的数组。
@PermitAll
表示允许所有的角色进行访问,也就是说不进行权限控制。@PermitAll可以标注在方法上也可以标注在类上,当标注在方法上时则只对对应方法不进行权限控制,而标注在类上时表示对类里面所有的方法都不进行权限控制。(1)当@PermitAll标注在类上,而@RolesAllowed标注在方法上时则按照@RolesAllowed将覆盖@PermitAll,即需要@RolesAllowed对应的角色才能访问。
(2)当@RolesAllowed标注在类上,而@PermitAll标注在方法上时则对应的方法也是不进行权限控制的。
(3)当在类和方法上同时使用了@PermitAll和@RolesAllowed时先定义的将发生作用(这个没多大的实际意义,实际应用中不会有这样的定义)。
@DenyAll
是和PermitAll相反的,表示无论什么角色都不能访问。@DenyAll只能定义在方法上。你可能会有疑问使用@DenyAll标注的方法无论拥有什么权限都不能访问,那还定义它干啥呢?使用@DenyAll定义的方法只是在我们的权限控制中不能访问,脱离了权限控制还是可以访问的。
开启注解 在启动类或者在配置类上添加 @EnableGlobalMethodSecurity(jsr250Enabled = true)
@EnableGlobalMethodSecurity(jsr250Enabled = true)
public class SecurityConfig extends WebSecurityConfigurerAdapter {
在controller方法上添加@RolesAllowed注解
@RolesAllowed({"ROLE_USER", "ROLE_ADMIN"})
//@PermitAll
@GetMapping("/demo")
public String demo() {
    return "spring security demo";
}
修改配置类
@Override
protected void configure(HttpSecurity http) throws Exception {

    http.formLogin() //表单提交
        .loginPage("/login.html") //自定义登录页面
        .loginProcessingUrl("/user/login")  //登录访问路径,必须和表单提交接口一样
        .successHandler(new MyAuthenticationSuccessHandler("/main.html"))
        .failureHandler(new MyAuthenticationFailureHandler("/error.html"))
        //授权
        .and().authorizeRequests()
        //设置哪些路径可以直接访问,不需要认证
        .antMatchers("/user/login","/login.html").permitAll()
        .anyRequest().authenticated()  //需要认证
        .and().csrf().disable(); //关闭csrf防护

}
@Secured注解
@Secured是由Spring Security定义的用来支持方法权限控制的注解。它的使用也是需要启用对应的支持才会生效的。@Secured 是专门用于判断是否具有角色的,能写在方法或类上。参数要以 ROLE_开头。
开启注解 在启动类或者在配置类上添加 @EnableGlobalMethodSecurity(securedEnabled = true)
@EnableGlobalMethodSecurity(securedEnabled = true)
public class SecurityConfig extends WebSecurityConfigurerAdapter {
在controller方法上添加@Secured 注解
@Secured("ROLE_ADMIN")
@GetMapping("/demo")
public String demo() {
    return "spring security demo";
}
支持表达式的注解
Spring Security中定义了四个支持使用表达式的注解,分别是@PreAuthorize、@PostAuthorize、@PreFilter和@PostFilter。其中前两者可以用来在方法调用前或者调用后进行权限检查,后两者可以用来对集合类型的参数或者返回值进行过滤。
@EnableGlobalMethodSecurity(prePostEnabled = true)
public class SecurityConfig extends WebSecurityConfigurerAdapter {
使用@PreAuthorize和@PostAuthorize进行访问控制
@PreAuthorize可以用来控制一个方法是否能够被调用,执行之前先判断权限,大多情况下都是使用这个注解。
//@PreAuthorize("hasRole('ROLE_ADMIN')")
//@PreAuthorize("hasRole('ROLE_USER') or hasRole('ROLE_ADMIN')")
//限制只能查询Id小于10的用户
@PreAuthorize("#id<10")
@RequestMapping("/findById")
public User findById(long id) {
    User user = new User();
    user.setId(id);
    return user;
}


// 限制只能查询自己的信息
@PreAuthorize("principal.username.equals(#username)")
@RequestMapping("/findByName")
public User findByName(String username) {
    User user = new User();
    user.setUsername(username);
    return user;
}

//限制只能新增用户名称为abc的用户
@PreAuthorize("#user.username.equals('abc')")
@RequestMapping("/add")
public User add(User user) {
    return user;
}
@PostAuthorize可以在方法调用完之后进行权限检查
// 在方法find()调用完成后进行权限检查,如果返回值的id是偶数则表示校验通过,否则表示校验失败,将抛出AccessDeniedException
@PostAuthorize("returnObject.id%2==0")
public User find(int id) {
    User user = new User();
    user.setId(id);
    return user;
}
使用@PreFilter和@PostFilter进行过滤
使用@PreFilter和@PostFilter可以对集合类型的参数或返回值进行过滤。使用@PreFilter和@PostFilter时,Spring Security将移除使对应表达式的结果为false的元素。
@PostFilter("filterObject.id%2==0")
public List<User> findAll() {
    List<User> userList = new ArrayList<User>();
    User user;
    for (int i=0; i<10; i++) {
        user = new User();
        user.setId(i);
        userList.add(user);
    }
    return userList;
}

@PreFilter(filterTarget="ids", value="filterObject%2==0")
public void delete(List<Integer> ids, List<String> usernames) {

}
2.4 授权原理
重写 #configure(HttpSecurity http) 方法,主要配置 URL 的权限控制
@Override
protected void configure(HttpSecurity http) throws Exception {
    http
            // 配置请求地址的权限
            .authorizeRequests()
                .antMatchers("/test/echo").permitAll() // 所有用户可访问
                .antMatchers("/test/admin").hasRole("ADMIN") // 需要 ADMIN 角色
                .antMatchers("/test/normal").access("hasRole('ROLE_NORMAL')") // 需要 NORMAL 角色。
                // 任何请求,访问的用户都需要经过认证
                .anyRequest().authenticated()
            .and()
            // 设置 Form 表单登录
        	//自定义登录页面,可以通过 #loginPage(String loginPage) 设置
            .formLogin()
//                    .loginPage("/login") // 登录 URL 地址
                .permitAll() // 所有用户可访问
            .and()
            // 配置退出相关
            .logout()
//                    .logoutUrl("/logout") // 退出 URL 地址
                .permitAll(); // 所有用户可访问
}
调用 HttpSecurity#authorizeRequests() 方法,开始配置 URL 的权限控制。
修改 WebSecurityConfig配置类,增加 @EnableGlobalMethodSecurity注解,开启对 Spring Security 注解的方法,进行权限验证。
@Configuration
@EnableGlobalMethodSecurity(prePostEnabled = true)
public class SecurityConfig extends WebSecurityConfigurerAdapter {
@RestController
@RequestMapping("/demo")
public class DemoController {

    @PermitAll
    @GetMapping("/echo")
    public String demo() {
        return "示例返回";
    }

    @GetMapping("/home")
    public String home() {
        return "我是首页";
    }

    @PreAuthorize("hasRole('ROLE_ADMIN')")
    @GetMapping("/admin")
    public String admin() {
        return "我是管理员";
    }

    @PreAuthorize("hasRole('ROLE_NORMAL')")
    @GetMapping("/normal")
    public String normal() {
        return "我是普通用户";
    }

}
授权流程
基于Filter
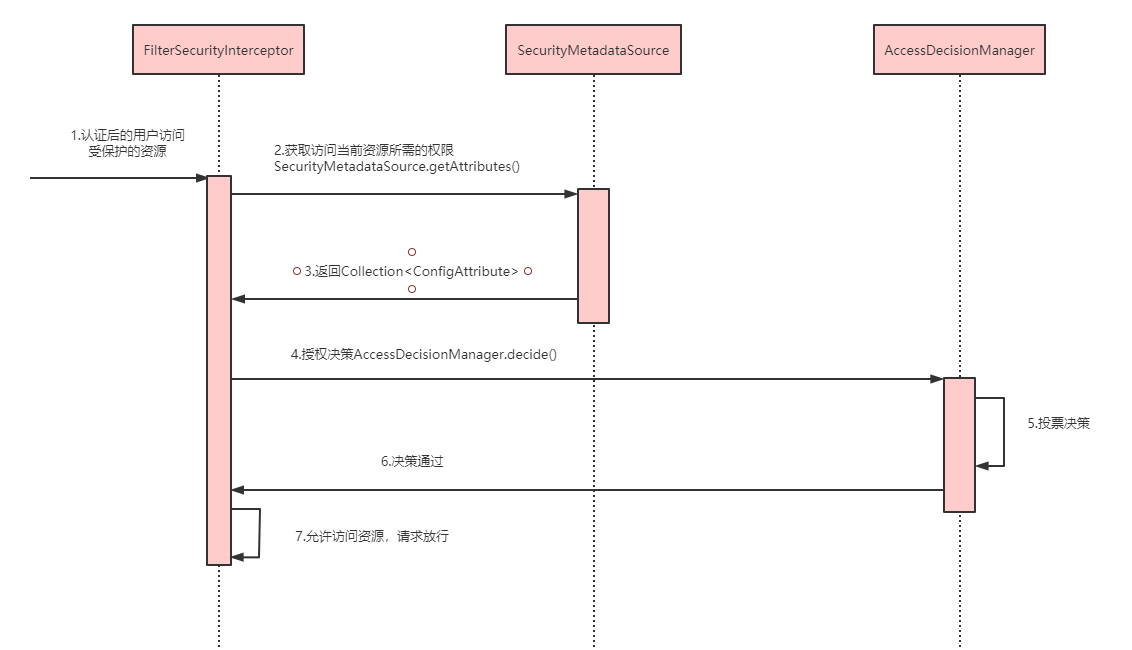
拦截请求,已认证用户访问受保护的web资源将被SecurityFilterChain中的 FilterSecurityInterceptor 的子 类拦截。
获取资源访问策略,FilterSecurityInterceptor会从 SecurityMetadataSource 的子类 DefaultFilterInvocationSecurityMetadataSource 获取要访问当前资源所需要的权限
Collection<ConfigAttribute>。SecurityMetadataSource其实就是读取访问策略的抽象,而读取的内容,其实就是我们配置的访问规则最后,FilterSecurityInterceptor会调用 AccessDecisionManager 进行授权决策,若决策通过,则允许访问资 源,否则将禁止访问。
基于AOP
//MethodSecurityInterceptor#invoke
public Object invoke(MethodInvocation mi) throws Throwable {
    InterceptorStatusToken token = super.beforeInvocation(mi);

    Object result;
    try {
        result = mi.proceed();
    }
    finally {
        super.finallyInvocation(token);
    }
    return super.afterInvocation(token, result);
}
相关接口
AccessDecisionManager
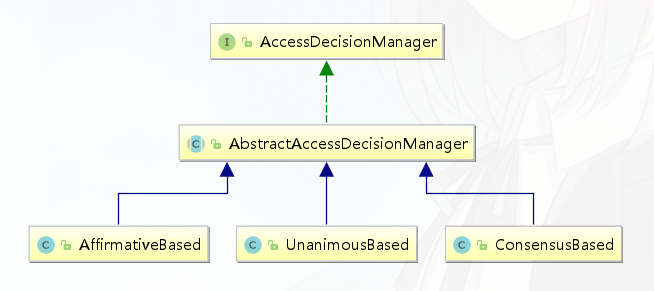
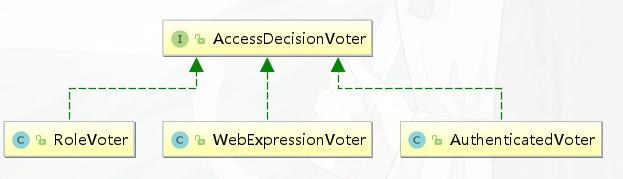
AccessDecisionManager采用投票的方式来确定是否能够访问受保护资源。 AccessDecisionManager中包含的一系列AccessDecisionVoter将会被用来对Authentication是否有权访问受保护对象进行投票,AccessDecisionManager根据投票结果,做出最终决策 。
public interface AccessDecisionManager {
	// ~ Methods
	// ========================================================================================================

	/**
	 * 用来鉴定当前用户是否有访问对应受保护资源的权限
	 * authentication:要访问资源的访问者的身份
	 * object:要访问的受保护资源,web请求对应FilterInvocation
	 * configAttributes:是受保护资源的访问策略,通过SecurityMetadataSource获取
	 */
	void decide(Authentication authentication, Object object,
			Collection<ConfigAttribute> configAttributes) throws AccessDeniedException,
			InsufficientAuthenticationException;

	boolean supports(ConfigAttribute attribute);

	boolean supports(Class<?> clazz);
}
AffirmativeBased
AffirmativeBased的逻辑是: (1)只要有AccessDecisionVoter的投票为ACCESS_GRANTED则同意用户进行访问; (2)如果全部弃权也表示通过; (3)如果没有一个人投赞成票,但是有人投反对票,则将抛出AccessDeniedException。 Spring security默认使用的是AffirmativeBased。
ConsensusBased
ConsensusBased的逻辑是: (1)如果赞成票多于反对票则表示通过。 (2)反过来,如果反对票多于赞成票则将抛出AccessDeniedException。 (3)如果赞成票与反对票相同且不等于0,并且属性allowIfEqualGrantedDeniedDecisions的值为true,则表 示通过,否则将抛出异常AccessDeniedException。参数allowIfEqualGrantedDeniedDecisions的值默认为true。 (4)如果所有的AccessDecisionVoter都弃权了,则将视参数allowIfAllAbstainDecisions的值而定,如果该值 为true则表示通过,否则将抛出异常AccessDeniedException。参数allowIfAllAbstainDecisions的值默认为false。
UnanimousBased
UnanimousBased的逻辑与另外两种实现有点不一样,另外两种会一次性把受保护对象的配置属性全部传递 给AccessDecisionVoter进行投票,而UnanimousBased会一次只传递一个ConfigAttribute给 AccessDecisionVoter进行投票。这也就意味着如果我们的AccessDecisionVoter的逻辑是只要传递进来的 ConfigAttribute中有一个能够匹配则投赞成票,但是放到UnanimousBased中其投票结果就不一定是赞成了。 UnanimousBased的逻辑具体来说是这样的: (1)如果受保护对象配置的某一个ConfigAttribute被任意的AccessDecisionVoter反对了,则将抛出 AccessDeniedException。 (2)如果没有反对票,但是有赞成票,则表示通过。 (3)如果全部弃权了,则将视参数allowIfAllAbstainDecisions的值而定,true则通过,false则抛出 AccessDeniedException。
AccessDecisionVoter
public interface AccessDecisionVoter<S> {

	int ACCESS_GRANTED = 1; //同意
	int ACCESS_ABSTAIN = 0; //弃权
	int ACCESS_DENIED = -1; //拒绝

	boolean supports(ConfigAttribute attribute);

	boolean supports(Class<?> clazz);
	// 返回结果是AccessDecisionVoter中定义的三个常量之一
	int vote(Authentication authentication, S object,
			Collection<ConfigAttribute> attributes);
}
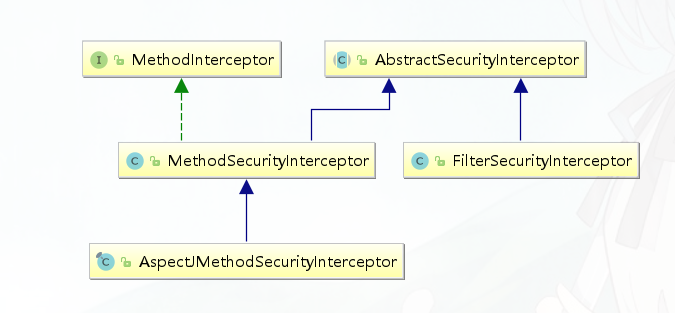
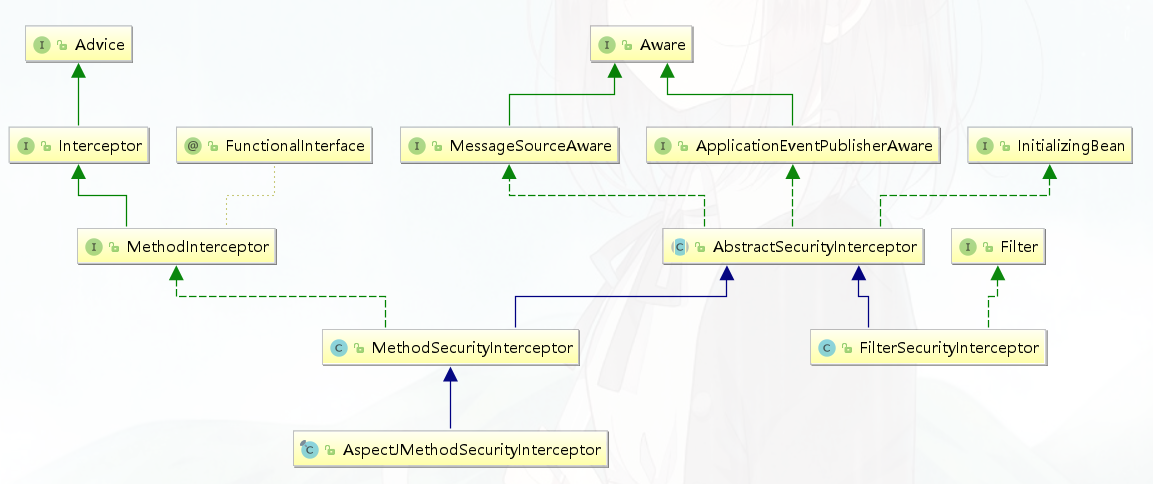
MethodSecurityInterceptor
Spring Security提供了两类AbstractSecurityInterceptor,基于AOP Alliance的MethodSecurityInterceptor,和基于Aspectj继承自MethodSecurityInterceptor的AspectJMethodSecurityInterceptor
//MethodSecurityInterceptor#invoke
public Object invoke(MethodInvocation mi) throws Throwable {
    InterceptorStatusToken token = super.beforeInvocation(mi);

    Object result;
    try {
        result = mi.proceed();
    }
    finally {
        super.finallyInvocation(token);
    }
    return super.afterInvocation(token, result);
}
3.Spring Security实现原理
3.1 核心配置
@EnableWebSecurity
https://www.processon.com/view/link/5fa53783637689653d8af2f7
@Retention(value = java.lang.annotation.RetentionPolicy.RUNTIME)
@Target(value = { java.lang.annotation.ElementType.TYPE })
@Documented
@Import({ WebSecurityConfiguration.class,
		SpringWebMvcImportSelector.class,
		OAuth2ImportSelector.class })
@EnableGlobalAuthentication
@Configuration
public @interface EnableWebSecurity {

	/**
	 * Controls debugging support for Spring Security. Default is false.
	 * @return if true, enables debug support with Spring Security
	 */
	boolean debug() default false;
}
WebSecurityConfigurerAdapter
WebSecurityConfigurerAdapter中我们可以选择自己想要修改的内容,来进行重写
HttpSecurity
安全过滤器链配置
@Configuration
public class CustomWebSecurityConfig extends WebSecurityConfigurerAdapter {

    @Override
    protected void configure(HttpSecurity http) throws Exception {
        http
            .authorizeRequests()
                .antMatchers("/resources/**", "/signup", "/about").permitAll()
                .antMatchers("/admin/**").hasRole("ADMIN")
                .antMatchers("/db/**").access("hasRole('ADMIN') and hasRole('DBA')")
                .anyRequest().authenticated()
                .and()
            .formLogin()
                .usernameParameter("username")
                .passwordParameter("password")
                .failureForwardUrl("/login?error")
                .loginPage("/login")
                .permitAll()
                .and()
            .logout()
                .logoutUrl("/logout")
                .logoutSuccessUrl("/index")
                .permitAll()
                .and()
            .httpBasic()
                .disable();
    }
}
- authorizeRequests()配置路径拦截,表明路径访问所对应的权限,角色,认证信息。
- formLogin()对应表单认证相关的配置
- logout()对应了注销相关的配置
- httpBasic()可以配置basic登录
所有的http相关配置可以通过查看HttpSecurity的主要方法获取。
| 方法 | 说明 |
|---|---|
| openidLogin() | 用于基于 OpenId 的验证 |
| headers() | 将安全标头添加到响应,比如说简单的 XSS 保护 |
| cors() | 配置跨域资源共享( CORS ) |
| sessionManagement() | 允许配置会话管理 |
| portMapper() | 允许配置一个PortMapper(HttpSecurity#(getSharedObject(class))),其他提供SecurityConfigurer的对象使用 PortMapper 从 HTTP 重定向到 HTTPS 或者从 HTTPS 重定向到 HTTP。默认情况下,Spring Security使用一个PortMapperImpl映射 HTTP 端口8080到 HTTPS 端口8443,HTTP 端口80到 HTTPS 端口443 |
| jee() | 配置基于容器的预认证。 在这种情况下,认证由Servlet容器管理 |
| x509() | 配置基于x509的认证 |
| rememberMe | 允许配置“记住我”的验证 |
| authorizeRequests() | 允许基于使用HttpServletRequest限制访问 |
| requestCache() | 允许配置请求缓存 |
| exceptionHandling() | 允许配置错误处理 |
| securityContext() | 在HttpServletRequests之间的SecurityContextHolder上设置SecurityContext的管理。 当使用WebSecurityConfigurerAdapter时,这将自动应用 |
| servletApi() | 将HttpServletRequest方法与在其上找到的值集成到SecurityContext中。 当使用WebSecurityConfigurerAdapter时,这将自动应用 |
| csrf() | 添加 CSRF 支持,使用WebSecurityConfigurerAdapter时,默认启用 |
| logout() | 添加退出登录支持。当使用WebSecurityConfigurerAdapter时,这将自动应用。默认情况是,访问URL”/ logout”,使HTTP Session无效来清除用户,清除已配置的任何#rememberMe()身份验证,清除SecurityContextHolder,然后重定向到”/login?success” |
| anonymous() | 允许配置匿名用户的表示方法。 当与WebSecurityConfigurerAdapter结合使用时,这将自动应用。 默认情况下,匿名用户将使用org.springframework.security.authentication.AnonymousAuthenticationToken表示,并包含角色 “ROLE_ANONYMOUS” |
| formLogin() | 指定支持基于表单的身份验证。如果未指定FormLoginConfigurer#loginPage(String),则将生成默认登录页面 |
| oauth2Login() | 根据外部OAuth 2.0或OpenID Connect 1.0提供程序配置身份验证 |
| requiresChannel() | 配置通道安全。为了使该配置有用,必须提供至少一个到所需信道的映射 |
| httpBasic() | 配置 Http Basic 验证 |
| addFilterBefore() | 在指定的Filter类之前添加过滤器 |
| addFilterAt() | 在指定的Filter类的位置添加过滤器 |
| addFilterAfter() | 在指定的Filter类的之后添加过滤器 |
| and() | 连接以上策略的连接器,用来组合安全策略。实际上就是"而且"的意思 |
WebSecurity
核心过滤器配置
WebSecurity 基于Servlet Filter 用来配置 springSecurityFilterChain,而springSecurityFilterChain 又被委托给了 Spring Security 核心过滤器DelegatingFilterProxy 。我们一般不会过多来自定义 WebSecurity , 使用较多的使其ignoring() 方法用来忽略 Spring Security 对静态资源的控制。
public void configure(WebSecurity web) throws Exception {
    web
        .ignoring()
        .antMatchers("/resources/**");
}
AuthenticationManagerBuilder
认证管理器配置
@Override
protected void configure(AuthenticationManagerBuilder auth) throws Exception {
    auth
        .inMemoryAuthentication()
        .withUser("admin").password("admin").roles("USER");
}
全局配置, 使用@Autowired注入的AuthenticationManagerBuilder是全局的身份认证器,作用域可以跨越多个WebSecurityConfigurerAdapter。
@Autowired
public void configureGlobal(AuthenticationManagerBuilder auth) throws Exception {
    auth
        .inMemoryAuthentication()
        .withUser("admin").password("admin").roles("USER");
}
3.2 FilterChain
Spring Security本质是一个过滤器链

认证的调用栈
<img src="SpringSecurity原理剖析及其实战.assets/image-20201127192610831.png" alt="image-20201127192610831"
     style="zoom:200%;"/>
DelegatingFilterProxy
https://docs.spring.io/spring-security/site/docs/5.3.4.RELEASE/reference/html5/#servlet-filterchainproxy
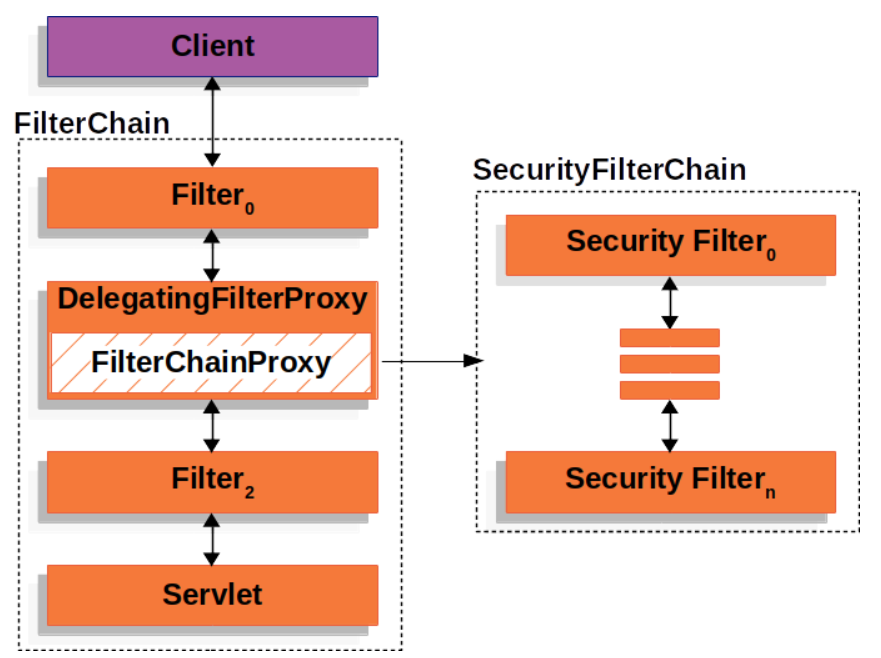
SecurityFilterChain
public interface SecurityFilterChain {

   boolean matches(HttpServletRequest request);

   List<Filter> getFilters();
}
SecurityContextPersistenceFilter
两个主要职责:请求来临时,创建 SecurityContext安全上下文信息,请求结束时清空SecurityContextHolder。过滤器负责核心的处理流程,存储安全上下文和读取安全上下文的工作完全委托给了HttpSessionSecurityContextRepository去处理
//SecurityContextPersistenceFilter#doFilter

HttpRequestResponseHolder holder = new HttpRequestResponseHolder(request,
				response);
//从Session中获取安全上下文信息,不存在创建一个新的SecurityContext
SecurityContext contextBeforeChainExecution = repo.loadContext(holder);

try {
    //请求开始时,设置安全上下文信息
    SecurityContextHolder.setContext(contextBeforeChainExecution);

    chain.doFilter(holder.getRequest(), holder.getResponse());

}
finally {
    //请求结束后,清空安全上下文信息
    SecurityContext contextAfterChainExecution = SecurityContextHolder
        .getContext();
UsernamePasswordAuthenticationFilter
表单提交了username和password,被封装成token进行一系列的认证,便是主要通过这个过滤器完成的,在表单认证的方法中,这是最最关键的过滤器。
// AbstractAuthenticationProcessingFilter#doFilter

Authentication authResult;

try {
    //  调用UsernamePasswordAuthenticationFilter的attemptAuthentication方法
    authResult = attemptAuthentication(request, response);
    if (authResult == null) {
        // return immediately as subclass has indicated that it hasn't completed
        // authentication
        //子类未完成认证,立刻返回
        return;
    }
    sessionStrategy.onAuthentication(authResult, request, response);
}
catch (InternalAuthenticationServiceException failed) {
    logger.error(
        "An internal error occurred while trying to authenticate the user.",
        failed);
    unsuccessfulAuthentication(request, response, failed);

    return;
}
catch (AuthenticationException failed) {
    // Authentication failed
    unsuccessfulAuthentication(request, response, failed);

    return;
}

// Authentication success
if (continueChainBeforeSuccessfulAuthentication) {
    chain.doFilter(request, response);
}

successfulAuthentication(request, response, chain, authResult);


// UsernamePasswordAuthenticationFilter#attemptAuthentication
public Authentication attemptAuthentication(HttpServletRequest request,
			HttpServletResponse response) throws AuthenticationException {
		if (postOnly && !request.getMethod().equals("POST")) {
			throw new AuthenticationServiceException(
					"Authentication method not supported: " + request.getMethod());
		}

		String username = obtainUsername(request);
		String password = obtainPassword(request);

		if (username == null) {
			username = "";
		}

		if (password == null) {
			password = "";
		}

		username = username.trim();
		//将认证信息封装成token, 当前认证状态是false
		UsernamePasswordAuthenticationToken authRequest = new UsernamePasswordAuthenticationToken(
				username, password);

		// Allow subclasses to set the "details" property
		setDetails(request, authRequest);
		// 通过AuthenticationManager去认证,并返回认证信息
		return this.getAuthenticationManager().authenticate(authRequest);
	}
ExceptionTranslationFilter
ExceptionTranslationFilter异常转换过滤器位于整个springSecurityFilterChain的后方,用来转换整个链路中出现的异常。此过滤器本身不处理异常,而是将认证过程中出现的异常交给内部维护的一些类去处理,一般处理两大类异常:AccessDeniedException访问异常和AuthenticationException认证异常。
FilterSecurityInterceptor
FilterSecurityInterceptor从SecurityContextHolder中获取Authentication对象,然后比对用户拥有的权限和资源所需的权限。这是一个方法级的权限过滤器, 基本位于过滤链的最底部 。这个过滤器决定了访问特定路径应该具备的权限,访问的用户的角色,权限是什么?访问的路径需要什么样的角色和权限?这些判断和处理都是由该类进行的。
HeaderWriterFilter: 用来给http响应添加一些Header,比如X-Frame-Options, X-XSS-Protection*,X-Content-Type-Options.
CsrfFilter:在spring4中被默认开启的一个过滤器,用于防止csrf攻击(跨站点请求伪造(Cross-site request forgery))
LogoutFilter :处理注销的过滤器
RequestCacheAwareFilter: 内部维护了一个RequestCache,用于缓存request请求
SecurityContextHolderAwareRequestFilter :对ServletRequest进行了一次包装,使得request具有更加丰富的API
SessionManagementFilter: 和session相关的过滤器,内部维护了一个SessionAuthenticationStrategy,两者组合使用,常用来防止会话固定攻击保护(
session-fixation protection attack),以及限制同一用户开启多个会话的数量AnonymousAuthenticationFilter
匿名身份过滤器,spring security为了兼容未登录的访问,也走了一套认证流程,只不过是一个匿名的身份。
3.3 主线源码分析
https://www.processon.com/view/link/5fa3ae25e401fd45d10296e1